How To Create A Base Marker In Rust
Learn to create base markers, why markers matter, how to understand and use them properly, and various other tips and tricks for map markers in Rust.
To create a base marker in Rust, open the map near your base entrance or tool cupboard, right-click the exact spot on the grid, then left-click to set the icon, color, and a short label. For Rust players who want better base navigation, team coordination, and resource tracking (especially newer players learning the map marker system) this turns the map from a simple navigation tool into a tactical overlay.
Custom markers let you pinpoint your base core, flag raid entry points, track resource nodes, and coordinate with teammates without voice chat. This guide explains why base markers matter, how markers differ from Rust’s separate ping system, how to create and customize them, how marker limits and team sharing work, where they fit into raid planning and resource runs, and what to do when markers or server settings get in the way.
Why Base Markers Matter in Rust
Rust’s world is deliberately hostile and disorienting. Monuments look similar at a distance, terrain features repeat, and the compass only shows cardinal directions and nearby marker labels. Player-created markers cut through that noise. A well-placed icon tells you exactly where your tool cupboard sits, which wall faces your clan’s most likely raid path, and where you stashed a sulfur node cluster a few grids over.
Default map icons cover monuments, the patrol helicopter, and other server-generated points of interest, but they can’t show your personal infrastructure. They won’t mark a hidden bunker entrance, an external tool cupboard tucked behind honeycomb, or a peek spot covering the roof. Custom markers fill that gap, and they double as a shared visual language for a team. A red icon for danger zones, a green one for loot rooms, a distinct color for upgrade priorities. Once everyone reads the same shorthand, coordination speeds up and confusion drops.
Understanding Rust Map Markers, Marker, and Ping Systems
Press G (default bind) to open the map, then right-click to add a marker; you’ll see a grid overlay running along the top and side. The compass strip at the top of your screen mirrors your in-game heading, and any persistent markers you’ve placed show up there too, though labels longer than three characters get cut down to fit.
It helps to treat markers and pings as two entirely separate tools, because Rust handles them very differently and mixing them up is one of the most common points of confusion for new players.
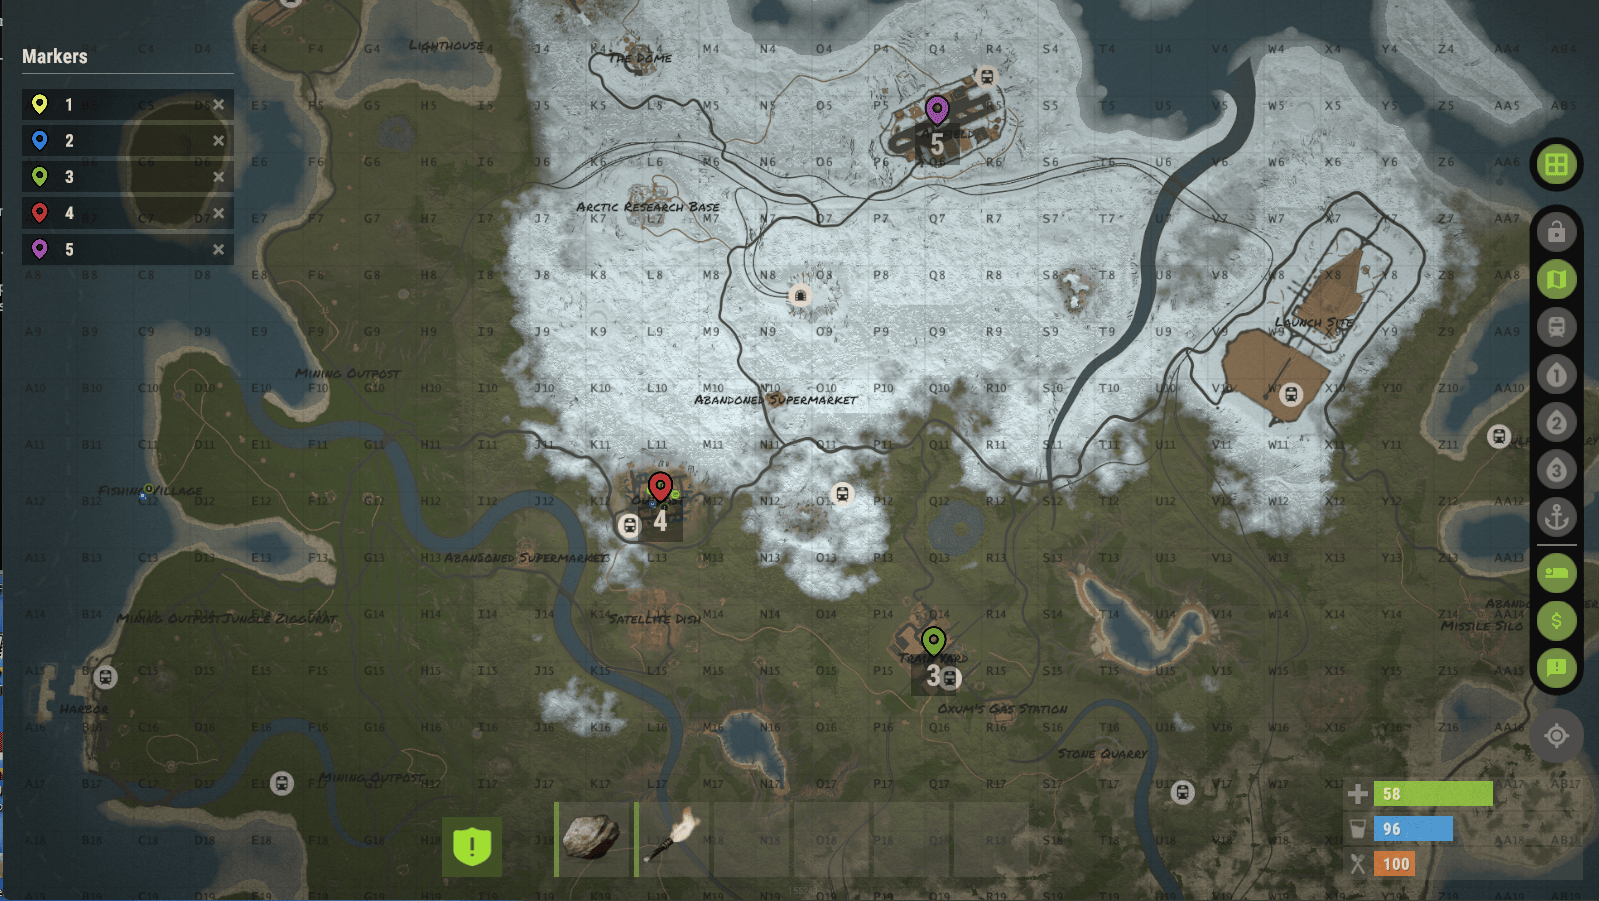
Markers are the persistent option. You place them from the map screen, they stay put through death, logout, and server restarts, and they only disappear when you delete them or the server wipes. Right-clicking an empty spot on the open map drops a marker immediately at that location, using whatever color comes next in the game’s automatic rotation (yellow, blue, green, red, and purple, cycling in that order). Once placed, the marker is displayed on both the map and compass. Left-clicking an existing marker opens an edit panel where you can choose from 12 different marker icons, override the color, and add a short label.
Pings work completely differently and are not accessed through the map at all. To ping, you need to actually be holding and using one of three specific tools: binoculars, a PTZ CCTV camera, or a drone. While looking through one of those, pressing the ping key (Mouse 3, or middle-click, by default) drops a temporary marker at whatever you’re aiming at. A single tap places a contextual ping that adapts to the target, so aiming at a resource node produces a node ping and aiming at a dropped weapon produces a weapon ping automatically. Double-tapping places a red “hostile” ping meant to flag danger, and holding the key down opens a radial menu with a full set of manual ping options if you want more control. Pings fade after roughly ten seconds and are visible to your whole team, along with a short voice callout from your character. There’s also a brief cooldown between pings so the system can’t be spammed.
The practical rule of thumb: use pings for anything happening right now, like calling a sniper or flagging an incoming Bradley, and use persistent markers for anything you want to remember later, like the location of your tool cupboard or a sulfur node cluster you plan to farm again next week.
Step-by-Step: Creating Your First Base Marker
Stand near your base entrance or tool cupboard, then open the map. The player icon centers on your position, so zoom in if you want to confirm you’re placing the marker on the exact grid square. Right-click that spot on the map. A marker icon appears immediately at that location, colored according to the automatic rotation.
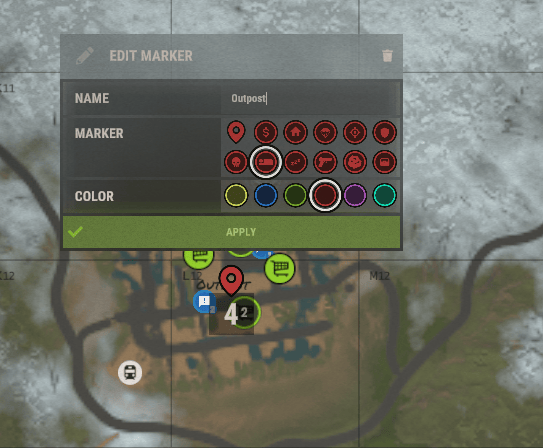
To customize it, left-click the marker you just placed. This opens an editing panel where you can pick a more suitable icon (a house works well for a main base, a lock or shield fits a tool cupboard, a crosshair or explosion icon flags a raid entry point), override the automatic color with something that contrasts against the terrain, and type in a short label, or even use simple symbols if you prefer. For example, a short base location label like “TC” is easy to read at a glance. Keep labels under four characters if you want them to display cleanly on the compass strip, since anything longer gets truncated there even though the full label still shows on the main map screen. Something like “TC” or “MAIN” reads clearly at a glance, where a longer phrase gets cut down to something less useful.
For anything you only need to flag for a moment, skip the marker system entirely and use a ping instead, provided you have binoculars, a CCTV camera, or a drone in hand, since that’s only applicable for short-term callouts rather than long-term base markers.
Customizing Markers for Maximum Utility
A single base can reasonably use more than one marker, though the game’s five-marker cap (covered below) means most players have to prioritize rather than tagging everything, since the cost of spending one of those slots on a low-value marker adds up fast. A common approach is to mark the tool cupboard first, since that’s the single most important point in any base, then use remaining markers for a main entrance, a loot room, or a known weak wall if raid defense is the priority.
Pick a consistent color scheme and stick to it across your team, even though each player’s markers are set individually. If your color scheme or use case changes, you can modify a marker later. Something like blue for infrastructure such as the tool cupboard or workbench, red for threats like a sightline an enemy base has on your wall, and green for resources such as a nearby node cluster, gives teammates an instant read on a marker’s purpose before they even check the label.
Naming conventions matter more than they might seem to at first glance, since you’re working with a strict character limit on the compass display. Something like “TCM” for the main tool cupboard, “ERF” for a roof entrance, or “SUL” for a sulfur node reads clearly even truncated, but choose abbreviations carefully so the compass view stays readable. The full label still appears on the map itself, so you can be more descriptive there if you leave a marker’s edit panel open long enough to type it out, but the compass version is what you’ll actually glance at during a fight.
Managing Markers: Edit, Share, and Delete
Left-click any existing marker to reopen its edit panel; it will pop up so you can change the icon, color, or label at any time. If a base entrance gets sealed off and a wall goes up in its place, swap the door icon for something that reflects the new function rather than leaving a stale marker sitting there. There’s no drag-and-drop for repositioning a marker in the current interface, so if the location needs to move, delete the old one and place a new one where you actually need it.
Sharing works differently than many players expect. According to Facepunch’s own patch notes for the system, when you’re the leader of a team, your teammates see all of your markers in addition to their own, rather than every team member’s markers being mutually visible to everyone. Note that this is one way, from the leader to teammates, not the other way around. That distinction matters for larger groups: if the team leader isn’t the one maintaining the base’s markers, useful information can end up invisible to half the group. Clans that split across multiple in-game teams run into a harder limit here too, since marker visibility doesn’t cross team boundaries at all. Someone on a different Rust team, even if allied and playing alongside you, won’t see your markers regardless of leadership status. Large groups that operate as several smaller teams usually need a designated marker officer, or a habit of relaying key coordinates through voice or text chat instead.
To remove a marker, hover over it on the map and right-click. It disappears from both the map and the compass immediately, with no confirmation prompt, so it’s worth a second look before you click. Note: there’s no undo or confirmation here. Clearing out old markers before a wipe, or as soon as a base gets abandoned or a node depletes, keeps the map usable rather than cluttered with stale information nobody needs anymore.
The Five-Marker Limit
Every player is capped at five persistent markers by default. Try to place a sixth and the game blocks it outright with an on-screen error message instead of placing it, forcing you to delete an existing one first. This limit exists server-side and can be adjusted by admins through a console variable, so the cap you’re playing under depends on which server you’re on, though five is what you’ll find on the overwhelming majority of servers running default settings.
Working within five markers means prioritizing. Most solo and small group players settle on the tool cupboard, a main entrance, and two or three resource or raid-related markers, then delete and replace as priorities shift through the wipe. Larger clans tend to split marker duty across multiple players rather than trying to cram an entire base’s worth of infrastructure into one person’s five slots, effectively multiplying the team’s practical marker budget by however many members contribute their own allotment. That means bigger groups may hit the cap a bit less often by spreading markers around, but each player still has the same maximum.

Strategic Uses Beyond the Base
Monument routes are worth a permanent marker slot if you run the same loop repeatedly. A marker at the entrance of whichever monument you farm most often saves a few seconds of squinting at unfamiliar terrain every single time, and that adds up over a long session. It also gives you simple ideas for repeat farming paths or return trips.
Raid planning benefits enormously from a scouted set of markers. Walk the target base ahead of time if you can, then mark the tool cupboard location, any visible wall weak points, roof access routes, and windows an enemy sniper might use. Share that plan with your raid team beforehand so everyone works from the same picture rather than improvising on the fly. During the raid itself, pings are actually the better tool for real-time updates like “breached” or “enemy incoming,” and a red ping can represent danger to teammates, since they’re instant and don’t eat into anyone’s five-marker budget, while the pre-placed markers handle the parts of the plan that don’t change once the raid starts.
Resource tracking pays off over the course of a wipe, particularly for sulfur, which tends to cluster in specific biomes rather than spreading evenly across the map. A single marker on a dense cluster you’ve found is often worth more than three markers scattered across weaker individual nodes, since it gives you marked locations to return to as repeatable farming references rather than a memory you’ll lose after a few days away from that part of the map.
Common Issues and Limitations
The five-marker cap is the most common frustration new players run into, and there’s no way around it as an individual beyond deleting something you already have placed. Some community servers run plugins or adjust the relevant console variable to raise the limit, but this varies by the specific rust server you’re playing on and isn’t something you can control on your own client.
Markers occasionally fail to display correctly after a server restart or following a client update, usually resolved by closing and reopening the map or relogging; if it still isn’t shown correctly after that, the issue may be server-side. Confusing a ping for a marker is a more common issue than an actual bug: if something you placed seems to have vanished within a few seconds, it was almost certainly a ping rather than a persistent marker, since pings are designed to fade automatically and only last about ten seconds by design.
A cluttered map with many markers active across a large team can be harder to read at a glance, even if it rarely causes real performance problems on modern hardware. Deleting markers tied to completed raids or depleted resources, and relying on team chat for anything genuinely temporary, keeps the map functioning as a quick reference rather than a wall of icons nobody can parse under pressure.
Rust Server Hosting, Administration, and Marker Persistence
Server wipes affect markers differently depending on the wipe type. A full wipe, which resets both the map and blueprints, clears every player’s markers along with everything else. A map-only wipe does the same, since a new map means the old coordinates no longer correspond to anything meaningful. A blueprint-only wipe, which resets research progress but keeps the same map running, generally leaves existing markers intact, since the underlying world hasn’t changed. Server admins usually announce which type of wipe is scheduled, though the practice varies from one community to another, so it’s worth checking your server’s rules or announcements if marker persistence matters to your planning. If they want more flexibility, admins can unlock higher marker limits by changing server settings.
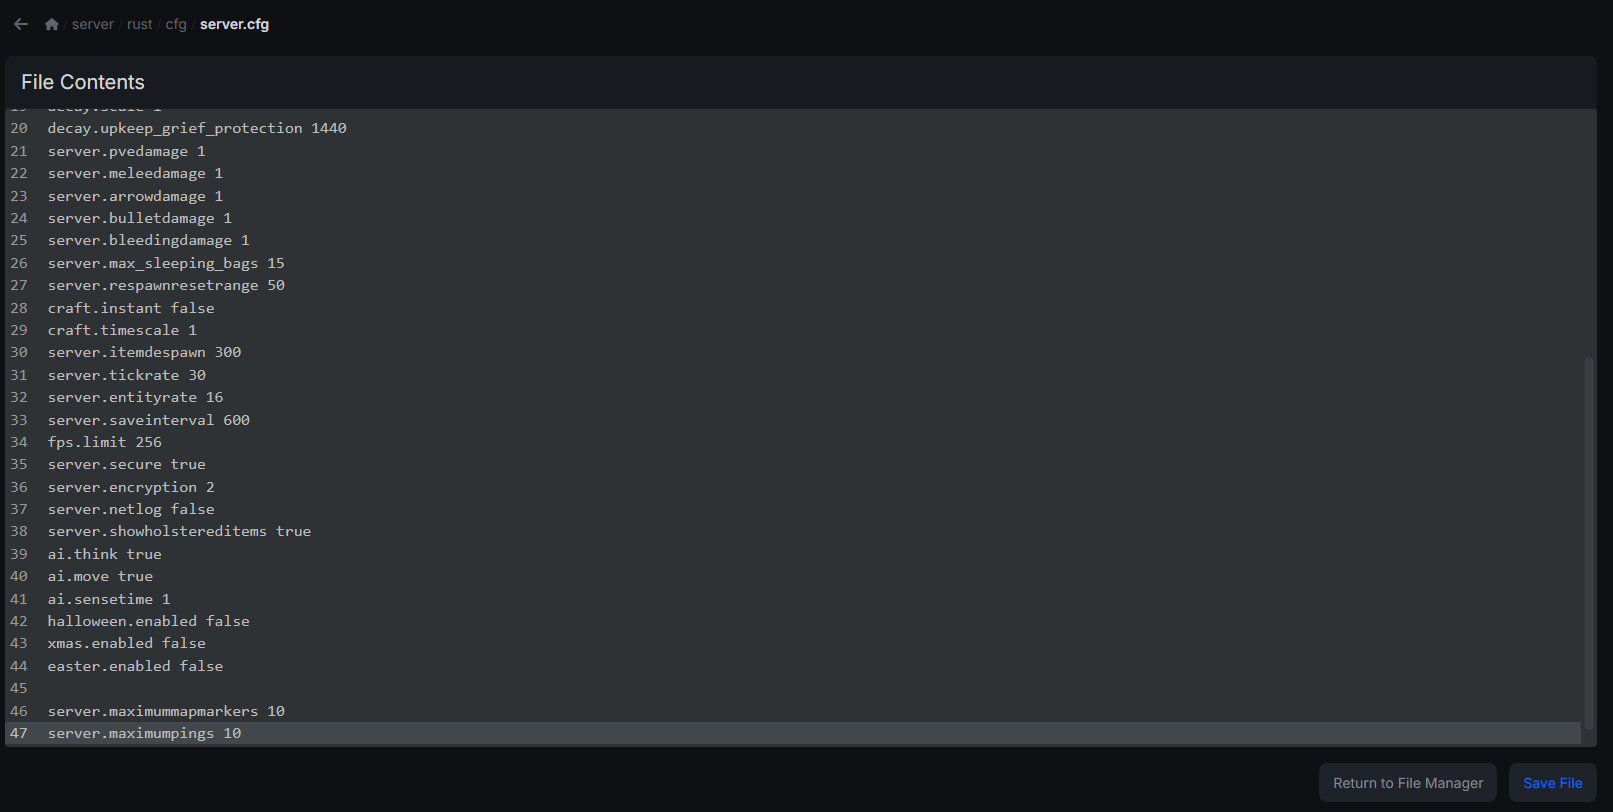
Admins have direct control over the marker system through server console variables. The marker limit is governed by server.maximummapmarkers, which defaults to five but can be raised or lowered by whoever runs the server. A related variable, server.maximumpings, controls how many pings can be active or how frequently they can be placed, depending on server configuration. Both are set through the server configuration file or adjusted live via RCON with a server-side command, and most third-party hosting control panels expose these settings somewhere in their gameplay or general settings section rather than requiring direct file edits.
Reliable server hosting matters here too, since marker data needs to be saved consistently to survive unexpected restarts without corruption or rollback. A host that handles world saves on a dependable interval and keeps team data in sync reduces the odds of markers desyncing between teammates or vanishing after a crash, though this is a general hosting quality concern rather than something unique to the marker system itself.
Five markers per player sounds restrictive until you organize them with intention and lean on pings for anything short-lived. Color-code by function, keep labels short enough to survive the compass truncation, understand that only a team leader’s markers propagate automatically to the rest of the group, and clear out anything stale before a wipe resets the board anyway. Players who treat the map as an actual tactical dashboard, rather than a minimap they open once and forget about, spend less time lost, less time repeating themselves over voice chat, and, finally, more time actually winning the fights that matter.
Was this article helpful?
Thanks for the feedback!