How to Set Up a Physgun Firewall API Key with Wisp
Wisp can communicate directly with the Physgun Firewall Portal, making it possible to manage firewall rules and filters without leaving your panel. Once connected, firewall configurations can be assigned through your eggs and deployed alongside the rest of your server settings.
This guide covers creating an API key in the Physgun Firewall Portal and connecting it to Wisp.
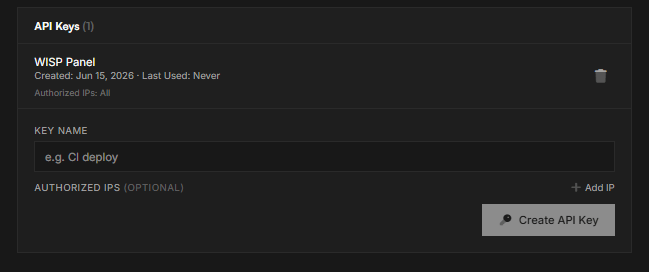
Creating an API Key
- Log in to the Physgun Firewall Portal.
- Navigate to the API section under Team Settings.
- Create a new API key.
- Give the API key a descriptive name so it can be easily identified later.
- Copy and save the generated API key.
Adding the Firewall Provider in Wisp
-
In Wisp, navigate to Settings → General → Firewall.
-
Click Add Provider.
-
Select the appropriate provider type.
-
Enter your assigned IP/CIDR prefixes.
-
Set the API URL to:
https://portal.physgun.com/api/v1 -
Paste the API key you created in the Physgun Firewall Portal.
-
Save the provider configuration.
Configuring Firewall Settings
Once the provider has been added, firewall management becomes available within your eggs.
- Open the desired egg.
- Navigate to the Firewall tab.
- Configure the rules and filters required by your application or game server.
- Save your changes.
Wisp will communicate directly with the Physgun Firewall API, allowing firewall configurations to be managed alongside the rest of your server deployment settings.