

Creating a DXRP S&Box server is the first step toward building a roleplay community with custom jobs, player-driven encounters, and a persistent world players want to return to. Whether you’re aiming for a small private group or a large public server, getting the setup right from the start makes everything easier later. A well-configured server means smoother performance, better moderation tools, and fewer headaches when your player base grows.
DXRP focuses on immersive roleplay systems inside S&Box, giving server owners room to customize rules, factions, economies, and gameplay features. That flexibility is what makes it appealing, but it also means there are a few important steps to handle before players can join. Choosing hosting, installing the correct gamemode, and configuring server settings all play a major role in how successful your server becomes.
In this guide, you’ll learn how to make a DXRP S&Box server, how to configure the essentials, and what to do next to turn a basic setup into a server players actually want to play on.
Running DXRP Gamemode on Your Server a
To get started with setting up DXRP, you have to add the gamemode to your server. If you’re running a dedicated server or VPS, open your batch file and edit your startup command line. If your server is using default settings, you should see that the gamemode is set to facepunch.sandbox. Set it to dxura.rp.
The next step to setting up your DXRP server is to choose a compatible map. For this guide, we’ll be using rp.downtown.scuffed. Your server should be running facepunch.flatgrass as the default map. Go ahead and change it to rp.downtown.scuffed. Save and exit the file.
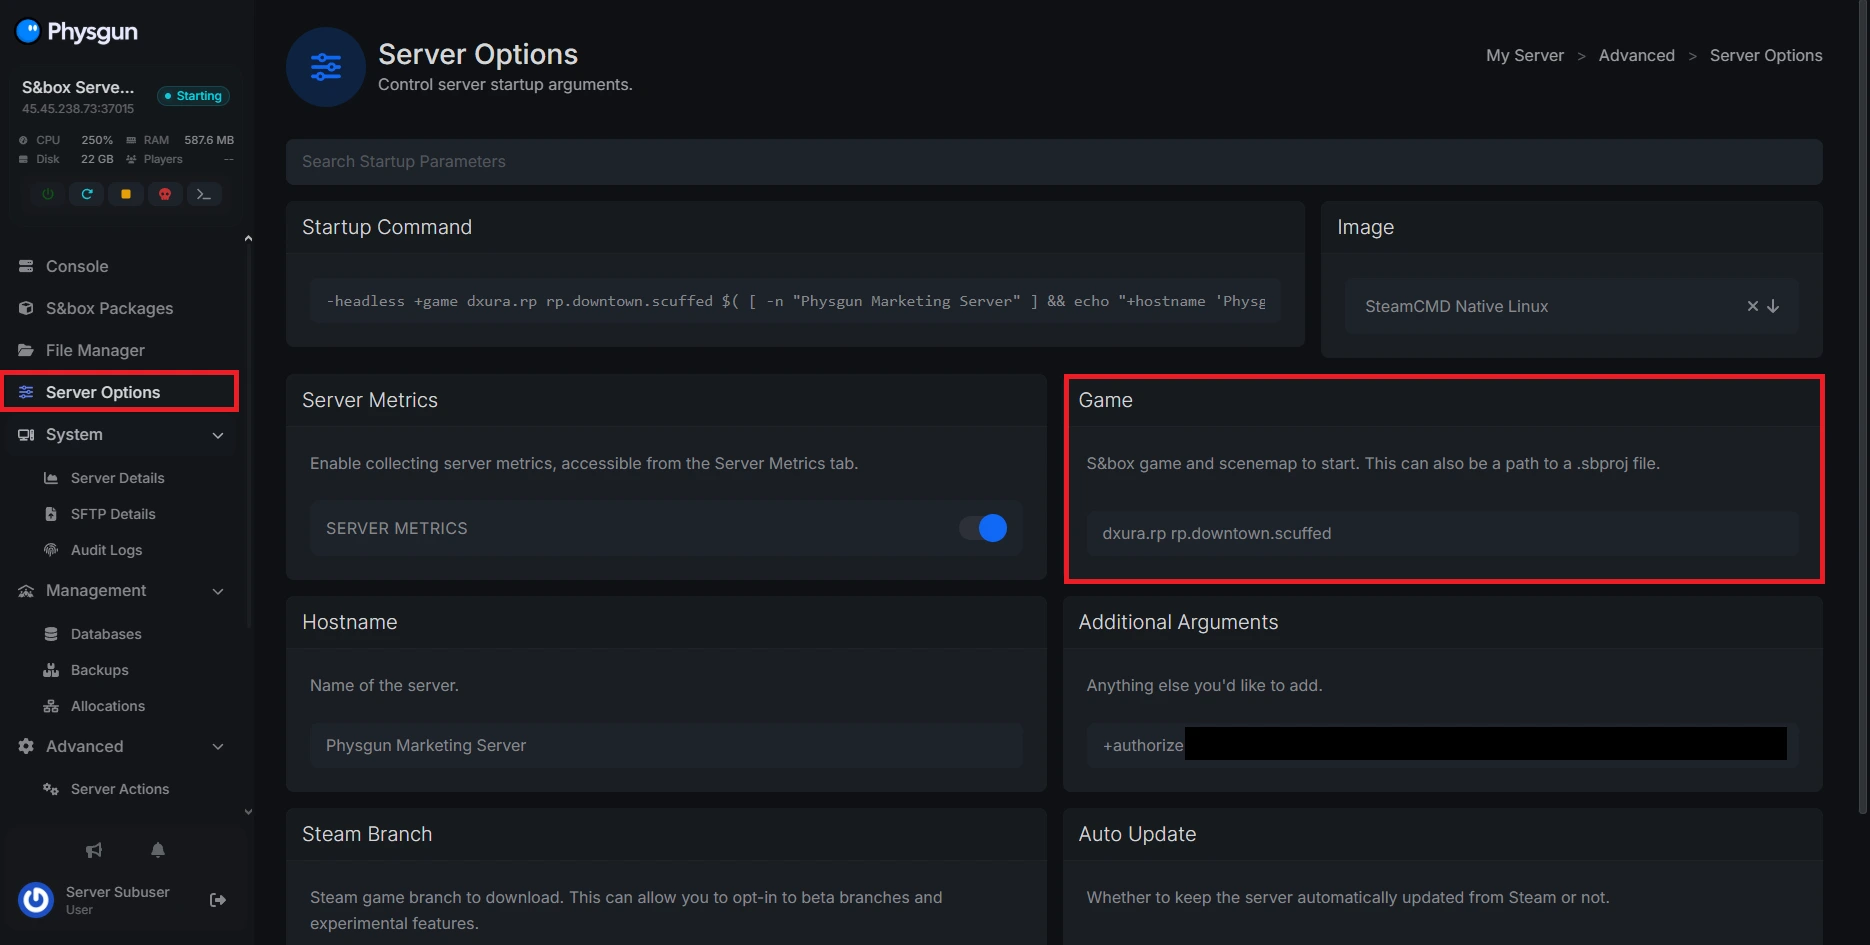
If you’re using Physgun, you can do this through the game panel. Just navigate to the Server Options tab and add the gamemode and map IDs to the Game argument.
Using the DXRP Network Panel
You’re not quite done yet! DXRP has its own network panel that you can use to manage and configure the finer, game-specific aspects of DXRP. Start by visiting the DXRP website and signing in using Steam.
Creating a Network
After signing in, you should be brought to the DXRP Dashboard. Read through all of the starting information and agree to the Terms of Use.
Next, you’ll be prompted to create your Network. Choose a name that you associate with your server and click Create Network.
Your Network Dashboard has been created!
Setting Up a Ruleset
The next thing you want to create is a ruleset that defines your server’s rules. Here’s how to do it:
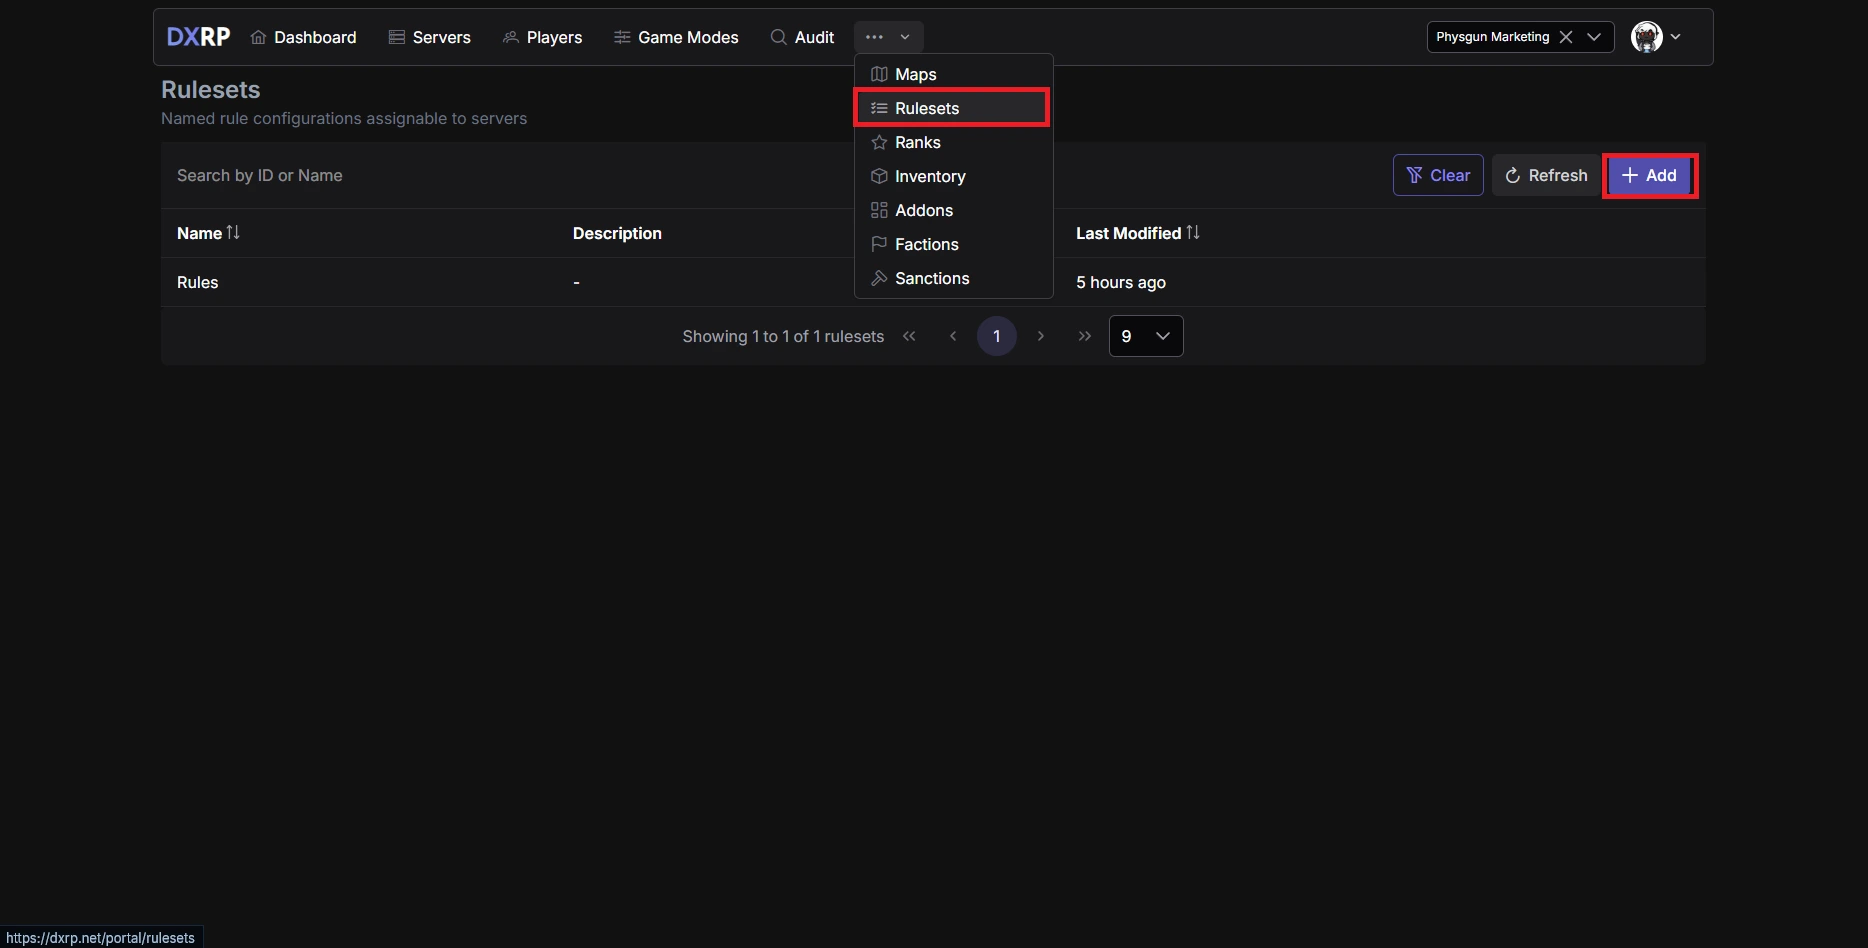
- Select the three dots at the top of your dashboard and select Rulesets.
- Create a new ruleset by clicking the Add button.
- Give your ruleset a name and description.
- Click Create.
- Once your ruleset is created, select Edit and begin writing your rules.
- Rulesets use markdown formatting. Here is a guide for how to use it.
Creating a New Server Dashboard
In the top bar, navigate to the Servers tab. Click Add and select a name for your server. This name will overwrite your server’s name, so it’s best to just copy your hostname and paste it here. Click Create to finalize your server.
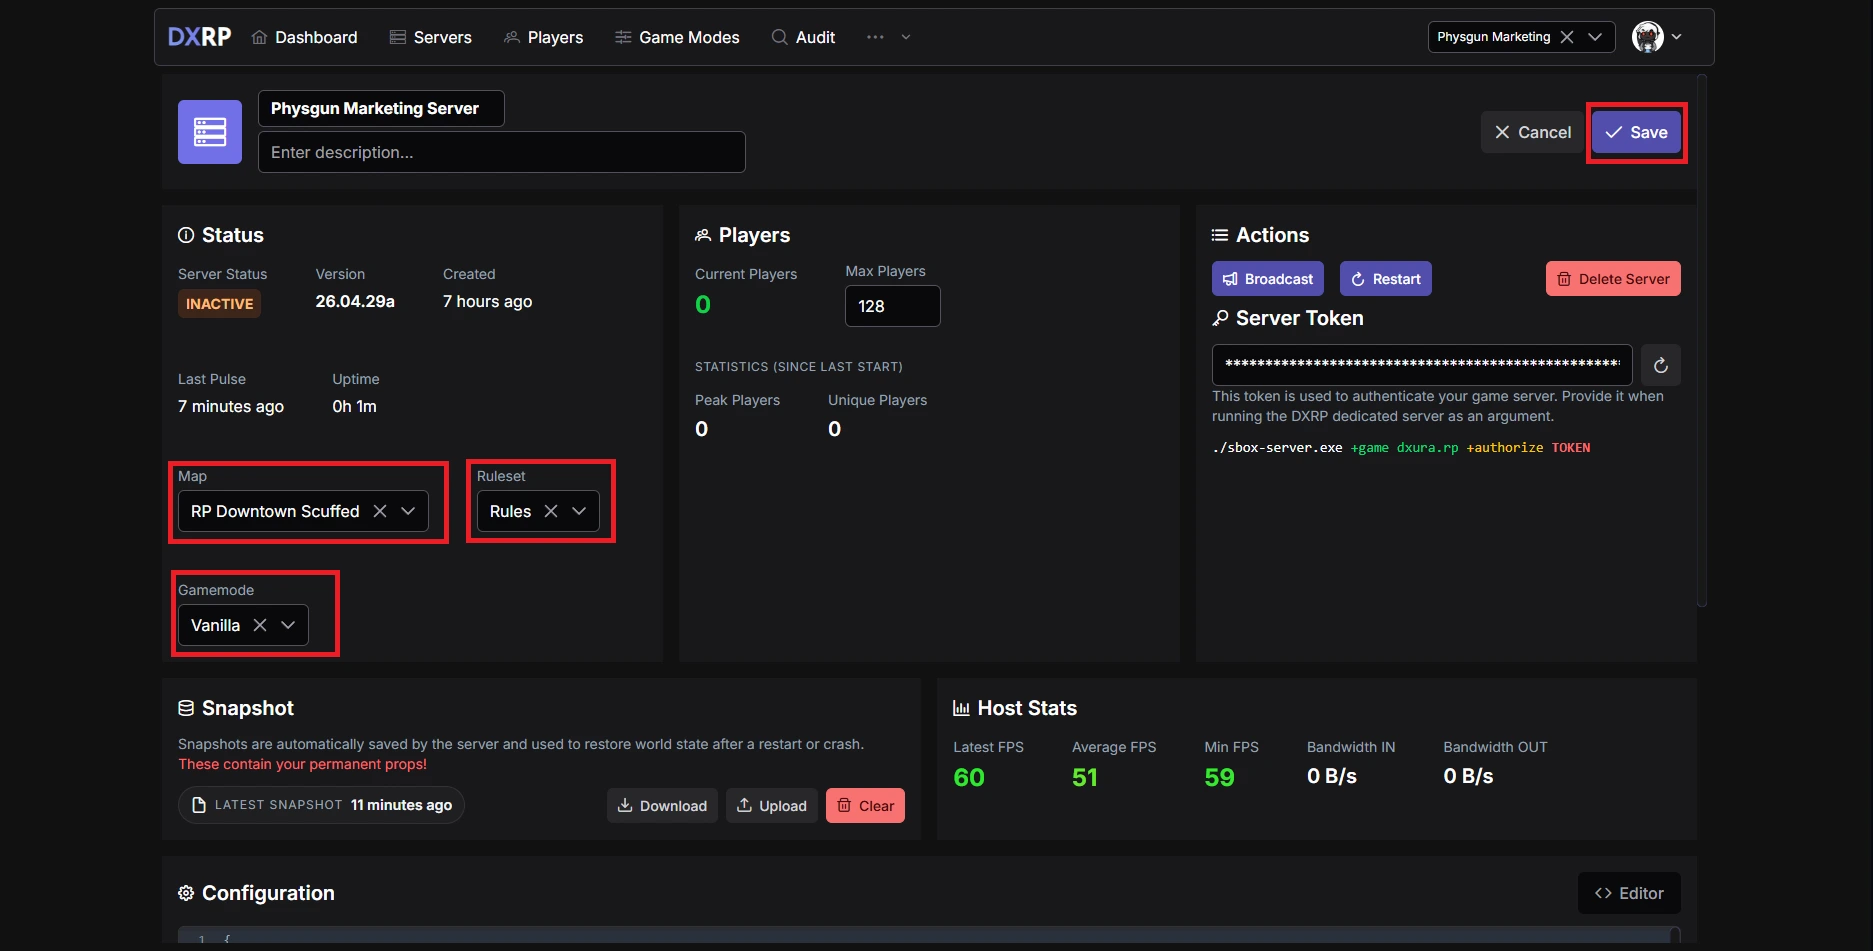
The next thing you want to do is click Edit and change the following properties:
- Map - You’ll be given a couple options. If you’re using rp.downtown.scuffed, select that option. You may also see options like Downtown 3T or Downtown TT. Select the option that represents the map you’re using.
- Ruleset - Assign the ruleset you created earlier
- Gamemode - Normally, you’ll just have one option for this: Vanilla
Click Save to confirm your options.
Note that at the bottom of your dashboard, there is a long list of configuration settings. Too many to cover here. Play around with them to better refine your server experience.
Assigning a Server Auth Token
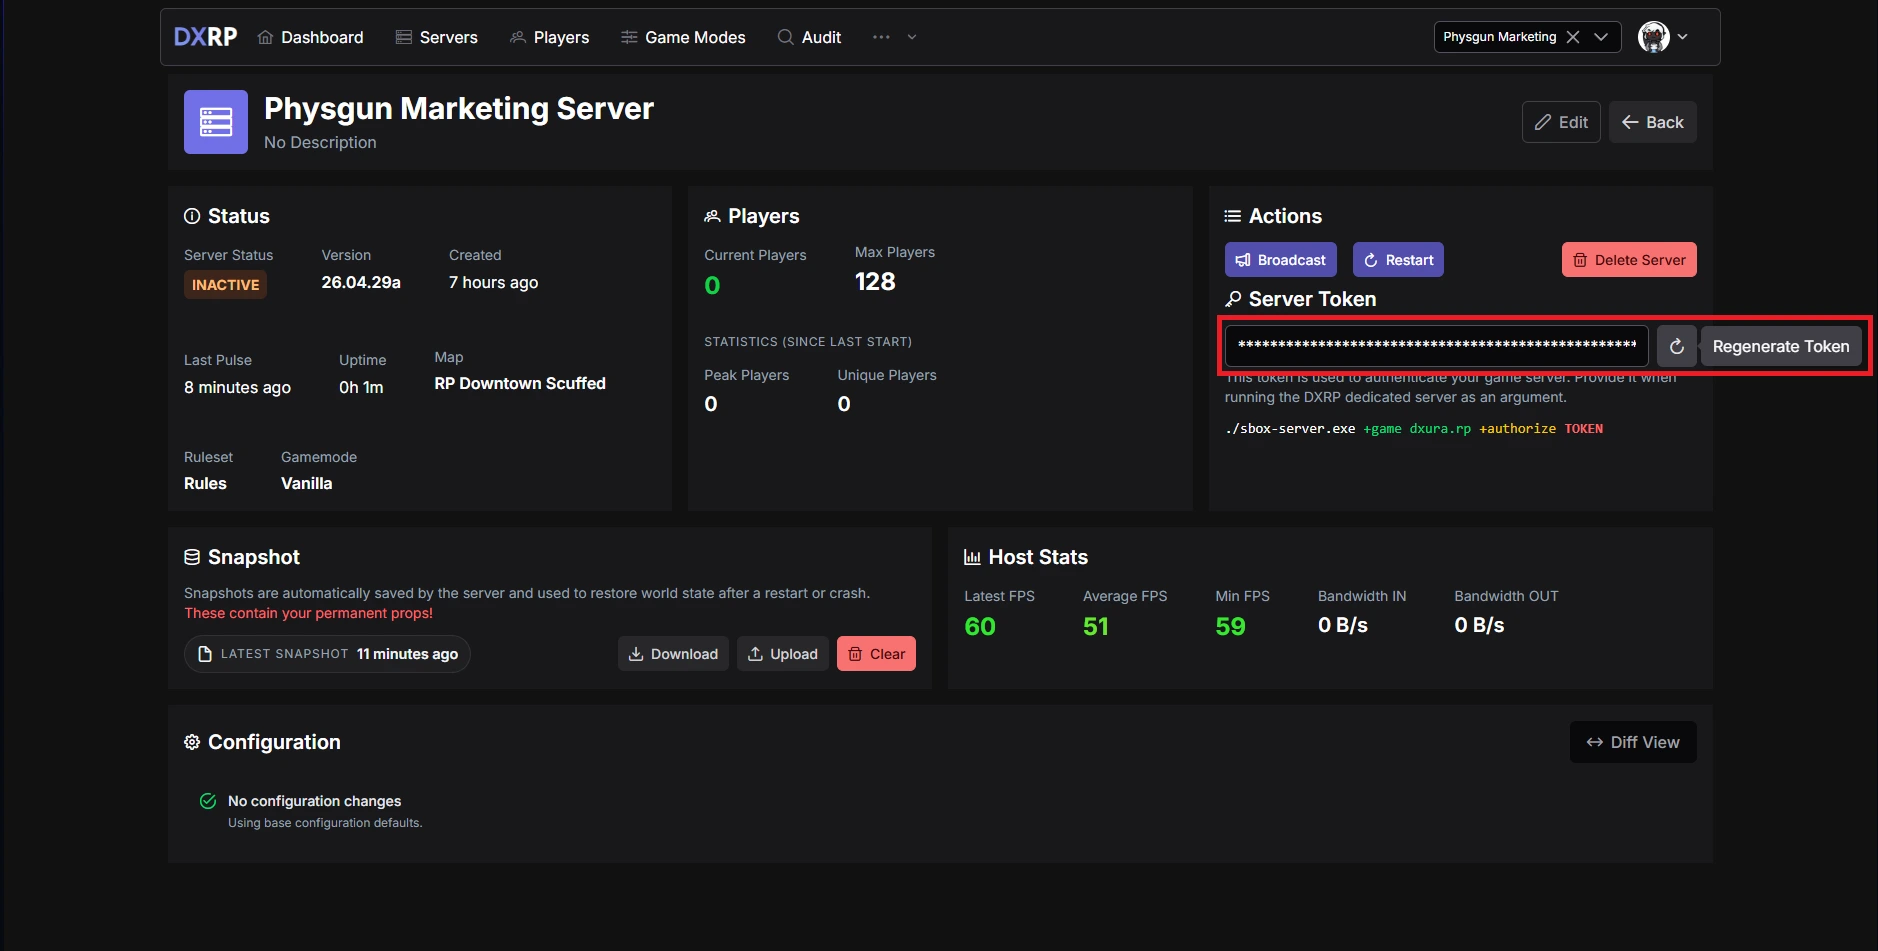
The last thing you need to do is assign an auth token to your server. On the right-hand side of your dashboard, you’ll see a redacted server token. Click the refresh button and copy the generated string.
Open your startup command line once again and add at the end “+authorize” followed by the token. If you’re on a Physgun server, navigate to the Server Options tab and input that same command line in the Additional Arguments box.
That’s it! Restart your server, and DXRP should be fully functional.
Final Thoughts
Setting up a DXRP S&Box server might seem like a lot at first, but once everything is in place, you’ve built a strong foundation for a fully customized roleplay experience. From installing the gamemode and choosing the right map to linking your network and assigning an auth token, each step brings you closer to a server that feels unique and engaging for your players.
What really sets DxRP apart is the level of control you have after setup. Beyond just getting the server online, you can continue refining your experience by adjusting rulesets, managing servers, and tweaking gameplay systems directly through the DXRP dashboard. Whether you’re updating rules, changing maps, or fine-tuning how your server operates, having the ability to configure your server in the dashboard makes ongoing management simple and efficient.
With your server up and running, the next step is building your community, creating memorable roleplay scenarios, and evolving your world over time.