Switching maps on a Windrose dedicated server isn’t as simple as typing a map name, you’re updating a world island ID in a JSON config file, and the wrong value either loads the old world or generates a brand new one, taking your existing world data with it. The correct IDs come from the Windrose interactive map, so you’ll need that open before you touch anything. This guide covers the full process: finding the right file through your file manager, grabbing the correct world ID, and adjusting world settings like difficulty and enemy aggression without breaking anything on restart.
Locate the World Files
-
Open the Physgun Gamepanel and stop the server.
-
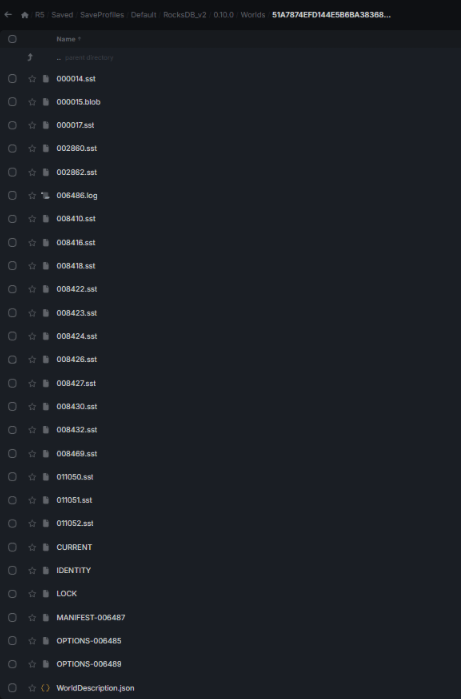
In the File Manager go to
R5/Saved/SaveProfiles/Default/RocksDB_v2/<game version>/WorldsEach sub‑folder is a separate world.
-
Inside the folder you want to use, open WorldDescription.json and note the line
"IslandId": "YOUR_WORLD_ID"This string is the ID you will copy later.
Note: The folder name must match this Island ID exactly; otherwise the server will ignore the folder.
Edit the Dedicated Server Configuration
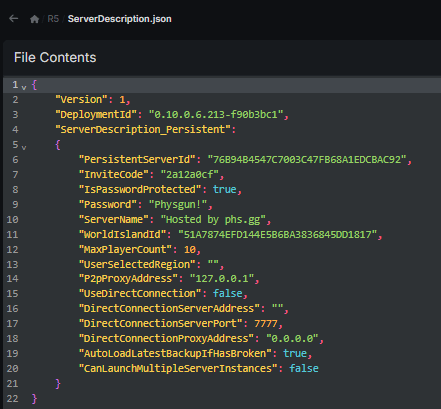
- Still in the File Manager, open
ServerDescription.jsonin the root R5 directory.
- Find the entry
"WorldIslandId": "CURRENT_ID"-
Replace CURRENT_ID with the Island ID you recorded from WorldDescription.json to modify the active world assignment in the server settings.
-
Save the file.
Changing the map on a Windrose dedicated server means stopping the server, locating the JSON configuration files, changing the World Island ID, and then restarting.
The three values now line up:
-
WorldIslandId in ServerDescription.json
-
Folder name under Worlds
-
IslandId inside the world’s WorldDescription.json
A single typo will cause Windrose to generate a new world on the next start.
Uploading a New World or Transferred World
If you have a world from another server or a single‑player save, first locate the local save folder on your PC, then get access to your server files:
-
Stop the server.
-
Zip the world folder (make sure the folder name equals its IslandId).
-
Upload the zip through FTP or the Gamepanel File Manager, then use the file manager navigate flow to extract it into the same Worlds directory. If a separate download window appears, just complete the upload there.
-
Open the newly extracted folder’s WorldDescription.json and copy its IslandId.
-
Paste that ID into ServerDescription.json as described above.
-
Start the server.
Some versions also expect a matching backup file in the Saved/SaveProfiles/Default/Backups directory. If that folder is missing, navigate to the extracted world path again, because the server may fall back to a blank world.
Adjust World Settings
Gameplay settings are configured in the WorldSettings section of WorldDescription.json. Common fields include:
{
  "Difficulty": "Medium",
  "ResourceMultiplier": 1.0,
  "EnemyAggression": "Normal",
  "SharedQuests": true
}
To change difficulty or resource rates:
-
Stop the server.
-
Edit the JSON values directly.
-
Save the file and restart.
You can also use custom settings here to adjust enemy health and damage multipliers for a more custom combat setup.
Tip: Combat difficulty settings affect overall combat intensity and enemy aggression, and shared quests can remain enabled or disabled alongside those values. Use a JSON validator to avoid syntax errors that would prevent the server from loading the world.
Restart and Verify
-
Start the server from the Gamepanel.
-
Wait for the startup log to finish.
-
Join the server in‑game and check:
-
Base locations are present.
-
Quest progress matches the previous save.
-
Difficulty setting reflects your edit.
If anything looks off, stop the server and double‑check the three Island ID locations.
Quick Checklist Before Switching Maps
-
Server stopped
-
Current world backed up
-
Target world folder name equals its IslandId
-
WorldIslandId in ServerDescription.json updated
-
All JSON files edited with the server offline
-
Server started and world verified
Following this list eliminates the most frequent cause of lost progress.
FAQ
Where does the active map get set? ServerDescription.json under the WorldIslandId key.
Can I keep several worlds on one server? Yes. Your server supports multiple worlds, each with its own save data, difficulty settings, and unique World ID, but only one can be active at a time. Store each unique world in its own folder under Worlds and change WorldIslandId whenever you want to switch.
Why did the server generate a new world after I changed the map? Usually a typo in the Island ID or a folder name that doesn’t match the ID. The server database relies strictly on the automatically generated string ID for the world folder name, so any mismatch triggers a new world.
Do I need to restart after editing world files? A full server restart is required for any change to take effect.
With the steps above, swapping maps on a Windrose dedicated server becomes a matter of copying an ID, aligning folder names, and restarting. Backups and careful editing keep your progress safe. Happy exploring!