If your VPS/Dedicated Server has a Rust server that is running but no one can connect, the issue is almost always port forwarding. Knowing how to port forward a Rust server correctly ensures your game server is visible on the internet and not blocked by your router, modem, or firewall settings. The process involves opening the correct server port, forwarding UDP ports, and verifying your IP configuration.
Want to skip the port forwarding headache entirely? Physgun’s Rust server hosting handles all networking automatically so your server is publicly accessible the moment it deploys.
In this guide, you’ll learn:
-
How to port forward Rust using your router’s IP address
-
Which server port and query port to set as UDP ports
-
The difference between TCP, UDP, and when a port trigger is not needed
-
How to access your router or modem dashboard and forward ports
-
How to adjust firewall settings on your computer so the firewall is not blocking connections
-
How to verify your IP, restart your device, and confirm the server is working
Once configured, your Rust server will be open, connected properly, and allow clients to join without issues.
Setting Up a Static Router IP Address
Before you start port forwarding your Rust server, you should set up a static IP address. This is because, by default, most routers cycle their IP address all the time, and setting up a static IP will save you the hassle of port forwarding your new IP address each time.
Start by opening your computer’s command prompt by searching for “cmd” in your Windows Start menu. Once that’s up, type “ipconfig” and hit enter. Here you can find your IPv4 Address, Subnet Mask, and Default Gateway. For the next few steps, you’ll need this information.
Setting Up a Static IP Through Your Internet Settings
-
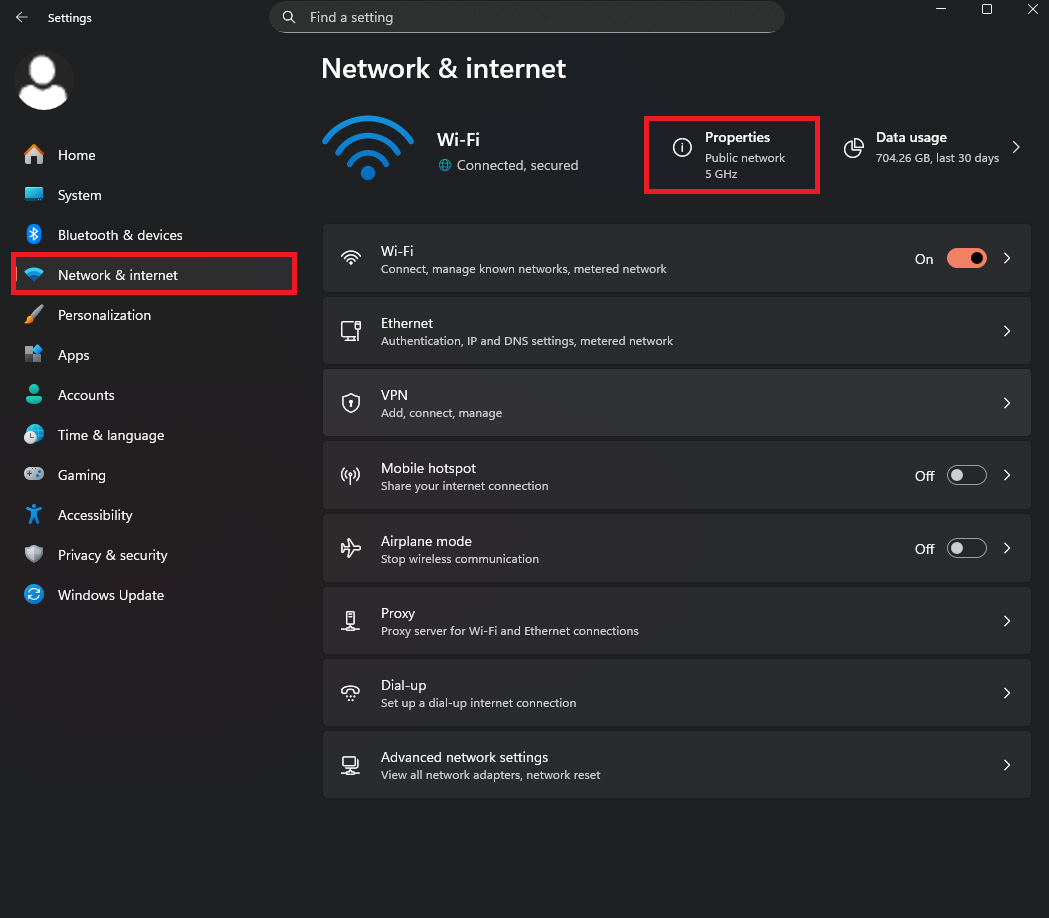
Open your system settings and select the Network & Internet tab
-
Click on Properties. You can be running off of Wifi or Ethernet, it doesn’t matter.
-
Navigate to the IP Assignment option and click Edit.
-
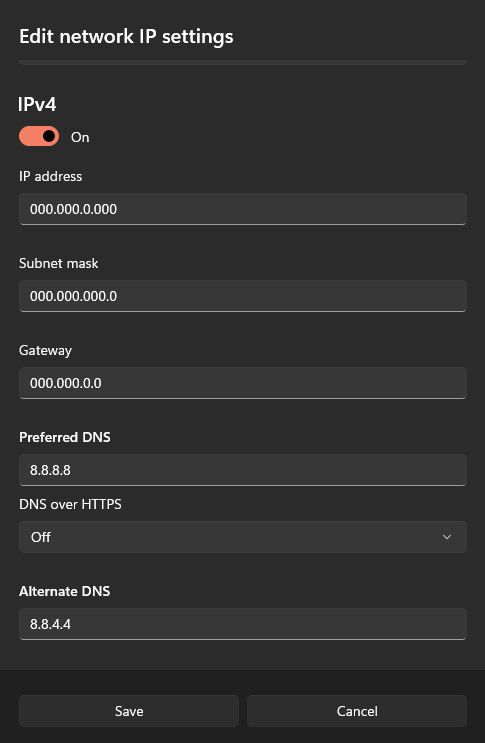
Click on the dropdown menu and change Automatic to Manual.
-
Enable IPv4 and add your IPv4 Address, Subnet Mask, and Gateway that you made note of earlier into the respective boxes.
-
Next, you’ll have to set up your preferred DNS server. You can find plenty of public hosts online, like Cloudflare, Quad9, or Google.
-
Cloudflare: Preferred - 1.1.1.1 | Alternate - 1.0.0.1
-
Quad9: Preferred - 9.9.9.9 | Alternate - 149.112.112.112
-
Google: Preferred - 8.8.8.8 | Alternate - 8.8.4.4
-
-
Choose any DNS server from the list you’d like to use, or perhaps use a different service if you already have one in mind.
-
Fill out the Preferred and Alternate DNS options.
-
After that, you’re all set!
Setting Up a Static IP Through Your Control Panel
-
Open your control panel through the Windows Start menu.
-
Click on Network and Internet, and then Network and Sharing Center.
-
Select Change Adapter Settings, then choose between Ethernet and Wifi, depending on what type of adapter your system uses.
-
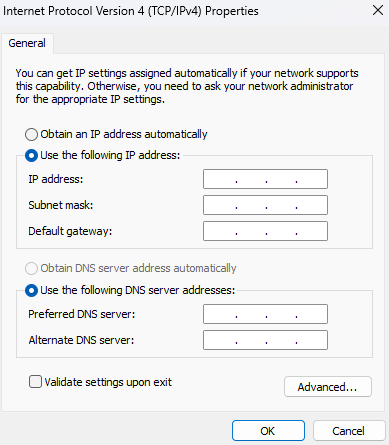
Right-click on the adapter you’re using and select Properties.
-
Right-click on Internet Protocol Version 4 (TCP/IPv4) and select Properties again.
-
Fill out your IPv4 Address, Subnet Mask, Gateway, and DNS, just as explained in steps 5-8 in the last section.
-
Check the Validate settings upon exit box and click OK.
-
And now you have a static IP address.
How to Port Forward Rust
Now that we have a static IP all set up, it’s time to port forward your Rust server so it shows up in the server list for people to join. This part of the guide may have points in which it gets rather vague. This is because port forwarding is different for each person, depending on their provider. If you have any trouble following along, feel free to reach out to us in our Discord, either linked below this guide or at www.[discord.com/invite/physgun](https://discord.com/invite/physgun) for more personalized help.
It’s important to note that if you’re concerned about security, you can set up port triggering, which is a special kind of port forwarding that will dynamically open and close ports as needed, decreasing the risk of hacking. This is done in roughly the same way as setting up a forward port, but it may differ based on your router.
Setting up a Forward Port on Your Modem
-
Open your web browser and enter your Default Gateway into the search bar. This will bring you to your modem log-in page.
-
Sign in to your modem dashboard and look for something along the lines of WAN services or IPv4 Port Forwarding.
- If you can’t find this option, your provider may not support port forwarding, and you’ll have to go through a VPN or other third-party service to forward your port. Check to see if yours uses CGNAT (Carrier-Grade Network Address Translation). Services like Starlink and newer Spectrum modems use this and make port forwarding nearly impossible on their own, unlike a NETGEAR or Arris modem.
-
You should see an option that says something like Add New Port Mapping.
-
When adding a new port, you’ll see several fields to fill out, namely Protocol, WAN/External port, LAN/Internal port, and Destination or Local IP.
-
In the protocol, you will be selecting TCP/UDP. If this option isn’t available, do a port for both options individually.
-
TCP, or Transmission Control Protocol, is connection-oriented, meaning it establishes a reliable connection before sending data. It guarantees delivery, keeps packets in order, and checks for errors. This makes it ideal for things like file downloads, emails, and web browsing. This means it’s more efficient and reliable than UDP, but has higher latency and overhead.
-
UDP, or User Datagram Protocol, is connectionless, meaning it sends data without establishing a connection or guaranteeing delivery. It doesn’t necessarily care if packets arrive or in what order they arrive. UDP is centered around speed, and it’s efficient for real-time applications like voice chat, gaming, or streaming, but it lacks the precision that TCP provides.
-
-
For the internal and external ports (or LAN and WAN), you will be setting up a range. This range should encompass your game port, RCON port, and Rust app port. By default, your range should be 28015-28023. Enter that into both values. If you have any custom ports, you have to make sure your range covers them without being insanely wide.
-
Lastly, set up your local or destination IP address. You’ll just be pasting your IPv4 into here.
-
Save and apply your new settings. You might have to restart your modem after you’re finished.
Setting Up Inbound Rules in Windows Defender
-
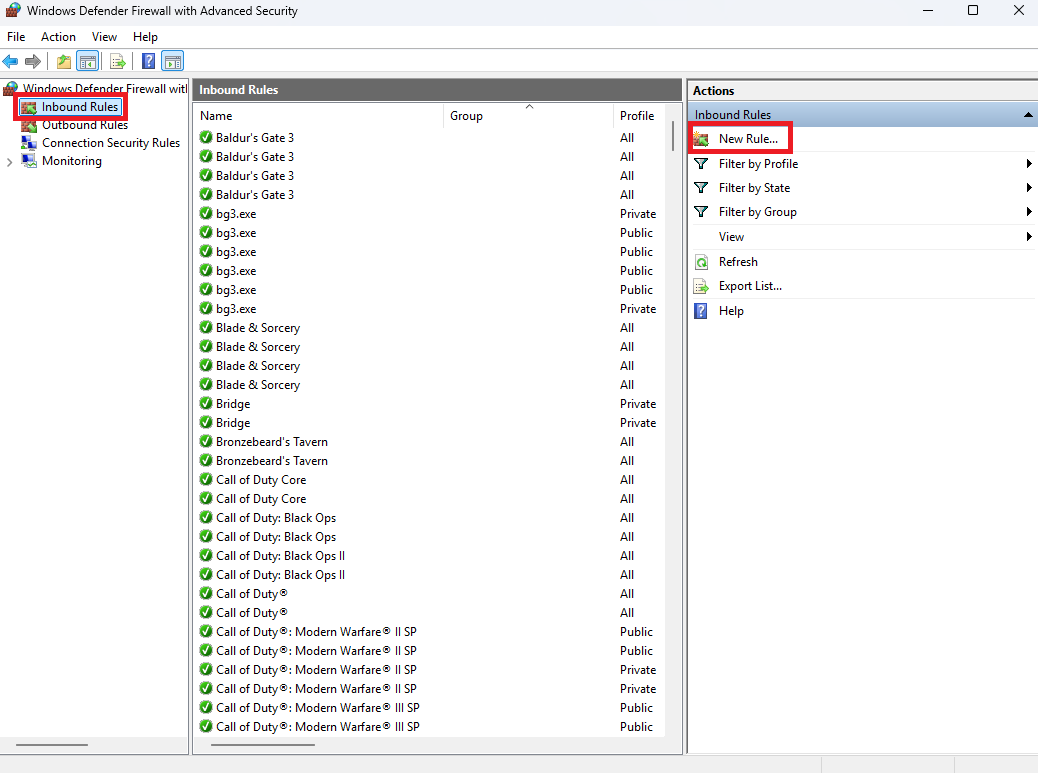
Open your Windows Start menu and search for “Windows Defender Firewall with Advanced Security”.
-
Open the application and select Inbound Rules.
-
Click New Rule and select Port.
-
Click Next and select TCP.
-
Select Specific local ports and set the port to the range you used when port forwarding.
-
Click Next and select Allow the connection.
-
Click Next again and make sure the Domain, Private, and Public options are all checked.
-
Click Next once more and set the name and description of your inbound rule. Set this to whatever you’d like as long as it tells you what the rule is.
-
Click Finish.
-
Follow steps 2-9 again, but for UDP rather than TCP.
With that last step, your Rust server will be completely port forwarded!