
Cursed Walking turns a standard Minecraft server into a modern zombie apocalypse survival experience, packed with mutant zombies, blood moons, lost cities, and enough chaos to keep even experienced players on edge. It’s a modpack, so setting up a dedicated server is a bit more involved than dropping in a vanilla server jar, you need to install the correct modpack version and make sure everyone connecting is running the same Cursed Walking client. This guide covers the full setup process so you and your friends can survive the apocalypse together.
What the Cursed Walking Modpack Brings
Cursed Walking is built on Minecraft 1.19 and uses Forge (or NeoForge) as its loader. Its core loop revolves around scavenging, fortifying shelters, and surviving periodic blood‑moon hordes. Key attractions include:
- Lost Cities world generation - sprawling, abandoned skylines that serve as perfect hunting grounds.
- Mutant zombies & special infected - each with unique abilities, forcing players to adapt tactics.
- Modern weapons & gear - rifles, pistols, and improvised explosives replace stone tools.
- Blood moon events - timed attacks that dramatically increase mob counts and loot drops.
Because the mod adds server‑side components (world generation, custom mob AI, loot tables), every participant must run the exact same modpack version. Physgun’s one‑click installer takes care of the heavy lifting, pulling the correct Forge version and all required files directly into your game panel.
Ordering a Physgun Server
- Log into the Physgun Gamepanel with your account.
- Click Create New Server, pick Minecraft, and select a plan close to your player base.
- Choose RAM that matches the mod’s demands - 6 GB is the absolute minimum, but 8-10 GB gives a comfortable cushion for blood‑moon spikes.
- Confirm the plan and hit Deploy.
Physgun automatically provisions an SSD‑backed VM and installs the vanilla Minecraft server files, leaving a clean slate for the modpack.

Installing the Cursed Walking Modpack
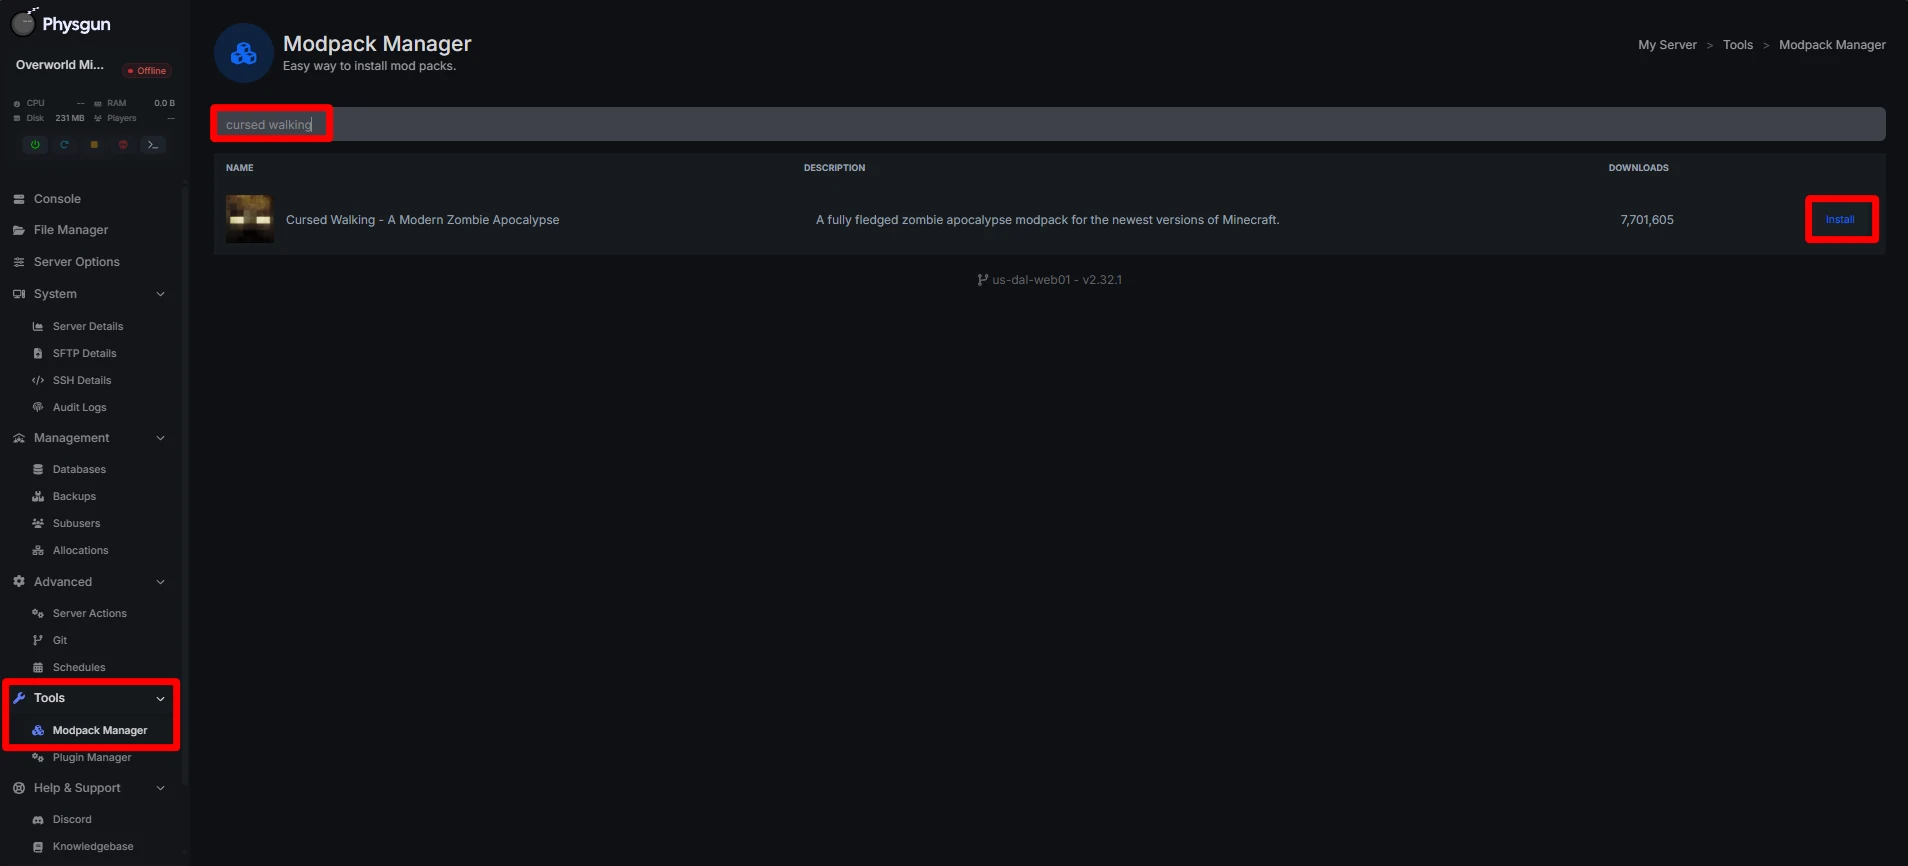
- In the Gamepanel, stop the freshly deployed server.
- Switch to the Modpacks tab and type “Cursed Walking” into the search bar.
- Pick the version that matches the latest release (usually shown as
Cursed Walking 1.19.x). - Click Install - Physgun will download the mod files, place the correct Forge loader, and adjust
server.propertieswhere needed.
The installer also writes the eula=true line into eula.txt, satisfying Minecraft’s licensing requirement.
eula=trueOnce the process finishes, you can start the server again. The first launch may take several minutes as the world generator creates the initial Lost Cities map.
First‑Time Server Startup
When you hit Start, monitor the console output. You should see messages like:
[Server thread/INFO]: Loading Forge mod loader version 45.2.0
[Server thread/INFO]: Initializing Cursed Walking...
[Server thread/INFO]: Generating Lost Cities world...
If any errors mention missing libraries or “Failed to load mod,” double‑check that you selected the correct modpack version. Otherwise, let the server finish generating the overworld; this can be the longest pause, especially on a modest CPU.
Tweaking server.properties
A handful of settings make life easier for a zombie‑heavy server:
| Setting | Recommended Value | Why it matters |
|---|---|---|
difficulty | hard | Keeps mob damage lethal, preserving the apocalypse feel. |
max-players | 5‑10 | Limits simultaneous stress on CPU during blood moons. |
view-distance | 6‑8 chunks | Reduces the number of loaded chunks per player, easing RAM pressure. |
spawn-protection | 0 | Allows players to claim land immediately. |
enable-pvp | true | Lets clans fight over resources if you want PvP. |
You can edit the file directly from the Gamepanel’s file manager or download it via FTP, make changes locally, then re‑upload.
Optimizing Performance for Blood Moons
Blood moons can push zombie counts into the thousands, overwhelming a server that isn’t tuned. Consider the following adjustments:
- Lower simulation distance (
simulation-distance=4inserver.properties). This caps how far the server processes mob AI. - Pre‑generate chunks around your main base using a tool like Chunky (available as a separate mod). It prevents the server from generating terrain on the fly during a horde.
Warning: Over‑aggressive reductions may cause mobs to despawn too quickly, breaking the intended challenge.
Configuring Lost Cities
Lost Cities works through a world‑type preset. To ensure the correct generation:
- Open
server.propertiesand setlevel-type=lostcities. - Delete any existing world folder (
world/) if you’re starting fresh; the preset only applies on first generation. - Restart the server and watch the console confirm “Generating Lost Cities world…”.
If you notice vanilla hills where cities should be, double‑check that lostcities is spelled correctly and that no other world‑type mods are overriding the setting.
Note: Switching the world type after the first launch corrupts terrain and can make the world unplayable. Always decide on Lost Cities before the initial generation or when creating a new world.
Getting the Client Side Ready
All players need the exact same client files; otherwise the handshake fails with “Registry mismatch” errors. The simplest route is the CurseForge launcher:
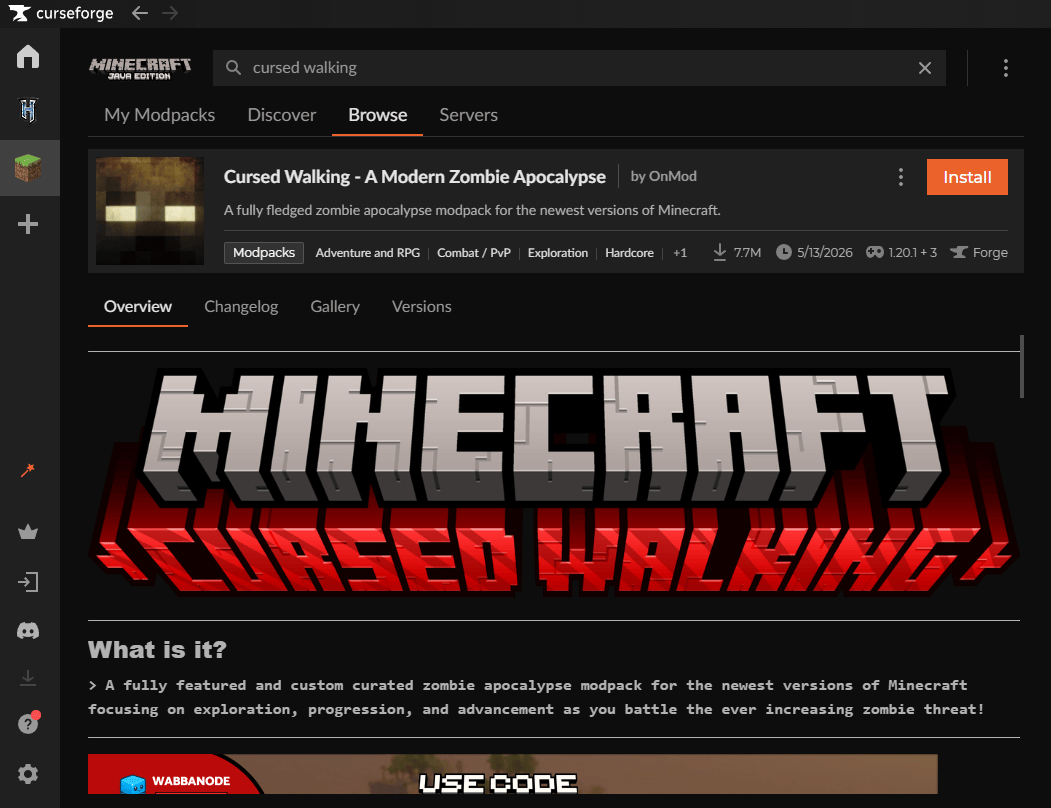
- Install CurseForge (or Prism Launcher) if you haven’t already.
- Search for “Cursed Walking” and click Install. Make sure the version number matches the server’s.
- Launch Minecraft through the launcher; the correct Forge profile will load automatically.
If some friends prefer other launchers, they can use the Modrinth App or ATLauncher as long as they point to the same modpack zip and Forge version.
Connecting to Your Server
In the Physgun panel, locate the IP address and port (default 25565). Copy it exactly; for example:
45.45.XX.XX:25565On the client:
- Open Multiplayer, click Add Server.
- Paste the address and give it a name.
- Hit Join.
The first connection may take a minute while the client syncs mod assets and the server streams the initial chunks. Subsequent logins are faster.
Inviting Friends and Managing Access
For private sessions, enable a whitelist:
white-list=trueAdd player names to whitelist.json via the file manager or using in‑game commands (/whitelist add <player>). This prevents strangers from joining your apocalypse and keeps the zombie count predictable.
If you want a larger community, consider setting up a Discord server with a bot that automatically adds members to the whitelist when they verify themselves.
Common Issues
- Mismatched modpack versions - leads to immediate disconnects. Double‑check the version number on both server and client.
- Insufficient RAM - crashes during blood moons are almost always memory‑related.
- Skipping backups before updates - a corrupted world can mean lost progress.
- Adding random mods - extra client‑side mods that aren’t on the server will break the handshake.
Avoiding these mistakes saves hours of frustration.
With the server live, the world generated, and your friends ready with the correct client, you’re set to survive the modern zombie apocalypse. Keep an eye on performance during those blood‑moon raids, back up often, and enjoy the gritty challenge that Cursed Walking delivers. Happy scavenging!