Setting up the Raidable Bases plugin transforms a standard Rust server into a dynamic world filled with automated PVE and PVP challenges. Instead of waiting for players to log off, admins can spawn bases across the terrain to give everyone a consistent target. By adjusting the configuration file, you can fine-tune everything from NPC difficulty to how many raidable bases stay active at once.
Getting the setup right ensures your community stays engaged without feeling overwhelmed:
- Customize Difficulty: Use profile settings to create distinct loot tables, rewarding those who tackle nightmare or expert bases with better gear than those hitting medium ones.
- Automate the Action: Edit your JSON file to set a minimum number of bases that spawn automatically, keeping the map populated immediately after a server wipe.
- Secure the Rewards: Configure the steal and loot settings to prevent players from sniping items out of containers before the raid is officially won.
This guide covers the free version of the plugin only.
What Does The Raidable Bases Plugin Do?
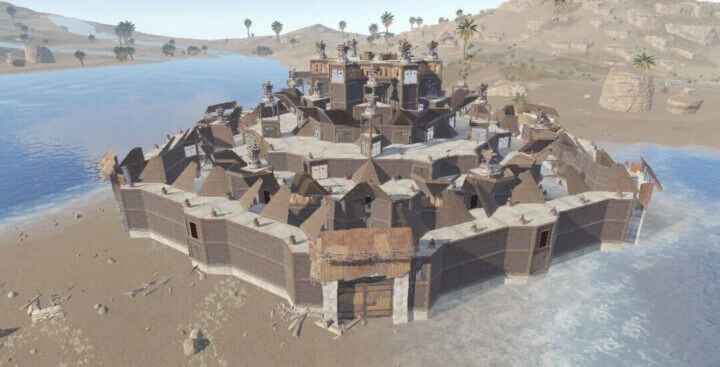
The Raidable Bases plugin makes random bases spawn across your Rust map for players to attack for loot. It’s notorious for being one of the most complicated plugins to set up, but it’s worth it when you have structures scattered across the map for players to raid. With enough creativity, you can even build custom monuments — as long as they stay within the confines of standard Rust base building.
Dependencies Required To Run Raidable Bases
The Raidable Bases plugin depends on the Copy Paste plugin to function. We have a guide on how to set it up in our Help Center.
Raidable Bases also integrates with several other plugins including Discord Logger, Life Support, Clans, Lusty Map, and more.
Configuring the Raidable Bases Plugin
This plugin has over 400 lines of configuration. This section covers assigning permissions and the important config categories.
Assigning Permissions to Admins
Assign permissions using Oxide’s permission system via your server console:
oxide.grant [user or group] [name of group or user Steam ID64] [permission]Available permissions:
- raidablebases.allow — Allows the player to use admin commands.
- raidablebases.canbypass — Allows bypassing dome restrictions.
- raidablebases.blockbypass — Allows bypassing the “Owning More Than One Raid” setting for clans/friends/teams.
- raidablebases.mapteleport — Allows teleporting to map markers.
- raidablebases.ddraw — Enables support for the FauxAdmin plugin.
- raidablebases.config — Allows opening the in-game configuration menu.
- raidablebases.banned — Bans the player from entering any raids.
For example:
oxide.grant group admin raidablebases.allowUse oxide.revoke to remove a permission if you’ve made a mistake. After running these commands, restart your server or type writecfg in the console.
Then open the main config file at oxide/config/RaidableBases.json.
Wipe Management Settings
These settings control how and when the plugin resets its stored data:
- Wipe triggers when Rust protocol changes — Automatically wipes data on game updates to prevent incompatibility.
- Wipe triggers on detection of map wipe — Resets data when the server map wipes.
- Wipe includes current data — Clears active raid/event data when a wipe triggers.
- Wipe includes lifetime data (NOT recommended!) — Also wipes long-term stats like ladder progress.
- Manual wipe (rb wipe) revokes permissions and groups from players — Ensures players lose raid-related permissions on manual wipe.
- Permissions and groups to revoke on wipe (rb revokepg) — List of Oxide groups/permissions to remove.
Experimental Settings
Advanced behavior overrides — use with caution:
- Apply Custom Auto Height To — Forces height adjustments for listed bases/profiles.
- Bunker Bases Or Profiles — Marks bases as bunker-style, affecting spawn logic.
- Multi Foundation Bases Or Profiles — Identifies complex bases for better placement handling.
Raid Management Settings
Core system behaviors, restrictions, and balances.
Spawn Restrictions
- Grids To Block Spawns At — Prevent spawning in specific map grid zones.
- Block Spawns At Positions — Hard-block spawn areas by coordinates and radius.
- Blocked Monument Markers — Prevent spawning near monuments.
- Additional Map Prefabs To Block Spawns At — Custom prefab exclusions.
Player Limits & Access
- Max Amount Of Players Allowed To Enter — Caps the number of raid participants.
- Bypass For PVP Bases — Ignores the player cap for PVP raids.
Loot & Containers
- Additional Containers To Include As Boxes — Treat extra deployables as loot containers.
- Allow Cupboard Loot To Drop — Tool Cupboards drop loot on destruction.
Entity & Trap Behavior
- Entities Allowed To Drop Loot — Controls which defenses drop items.
- Despawn Dropped Loot Bags When Base Despawns — Cleanup toggle.
Player Restrictions
- Allow Teleport / Ignore Respawning — Controls teleport usage during raids.
- Allow Players To Use Ladders — Enables traversal inside the base.
- Allow Players To Upgrade Event Buildings — Usually disabled to prevent griefing.
- Allow Players To Loot Traps — Prevents easy farming of defenses.
Terrain Placement
Toggles for spawning on: Inland, Beaches, Ice, Roads, Rivers, Railroads, Building topology, Monument topology.
Plugin Support
Blocks the following plugins during raids to prevent exploits: DoubleJump, LifeSupport, RestoreUponDeath, Custom Loot / NPC Kits.
Loot Distribution Logic
- Divide Rewards Among All Raiders — Splits loot between participants.
- Only Award First Attacker / Owner — Restricts rewards to the initiating player.
- Lock Treasure To First Attacker — Prevents stealing.
Despawn Timers
- Minutes Until Despawn After Looting
- Minutes Until Despawn After Inactive — Controls raid lifecycles.
PVP Mechanics
- PVP Delay Between Zone Hopping — Anti-exploit cooldown.
- Players With PVP Delay Can Damage… — Fine-tunes combat rules.
Anti-Exploit Systems
- Prevent Players From Hogging Raids — Prevents back-to-back raiding that locks others out.
- Block Clans/Teams/Friends From Owning More Than One Raid — Prevents faction abuse across multiple raid points.
Environment & Cleanup
- Prevent Fire From Spreading — Prevents fire propagation.
- Destroy Boxes/Turrets Clipped Too Far Into Terrain — Prevents entities from hiding under the map.
- Eject Sleepers/Scavengers/Mountables/Deployables Before Spawning A Base — Clears the area before a base spawns.
Event Settings
Controls how raids spawn and are managed.
Maintained Events
- Max Maintained Events — Number of always-active raids.
- Time To Wait Between Spawns — Delay between spawns.
- Minimum/Maximum Players Online — Population gating.
- Include PVE/PVP Bases — Mode selection.
- Spawn Bases X Distance Apart — Prevents clustering.
Manual Events
- Max Manual Events — Limit on admin-spawned raids.
- Bypass Lock Treasure Settings — Overrides ownership rules.
Scheduled Events
- Enabled — Toggle the system on or off.
- Every Min/Max Seconds — Spawn interval range.
- Max Scheduled Events — Total allowed at once.
- Chance To Randomly Spawn PVP Bases — Randomizes mode selection.
Adding Copy Paste Data to Spawn Bases
For the plugin to spawn bases, you need to define base files from the Copy Paste plugin. In your console, run:
rb.config add "[profilename]" "[basefilename1]" "[basefilename2]" "[basefilename3]"- profilename — The difficulty profile the base falls under.
- basefilename1-3 — The names of the base files in your Copy Paste plugin data.
For example:
rb.config add "Easy Bases" "myeasybase001" "myeasybase002"Use rb.config.list to see all active bases.
Difficulty Levels and Profiles
Profile settings are located at oxide/data/RaidableBases/Profiles. Each profile contains all data for a difficulty level — NPC equipment, base files, paste options, rewards, materials, and more.
Difficulty levels are largely just a label — you define what each one means. Here’s a suggested setup:
- Easy (0) — Little to no NPCs, basic loot, simple builds with few defenses.
- Medium (1) — Slightly larger bases, a small number of NPCs, solid loot.
- Hard (2) — Big bases with heavy defenses, plenty of well-equipped NPCs, great loot.
- Expert (3) — Huge bases with strategic defenses, NPCs with strong kits, top-tier loot.
- Nightmare (4) — Maximum difficulty across the board with the highest-tier rewards.
Changing The Default Loot Tables
First, generate loot for all difficulty profiles by running this in your console:
rb.populate allIf loot tables weren’t already generated, you’ll see “Saved to ‘Default’” at the end — this is what all profiles pull from by default if their own loot file isn’t filled out.
Navigate to oxide/data/RaidableBases. Here you’ll find your default loot file and a folder called Editable_Lists (for your personal reference — not used by the plugin directly). The plugin developer recommends using these as a starting point, modifying them, then copying the result into the actual loot file.
Each item entry in the loot pool lets you configure:
- shortname — The item’s short name (weapons, armor, ammo, or anything else).
- minimum/maximum amount — The quantity range to give.
- skin — The item’s skin ID.
Once you’re happy with your changes, open oxide/data/RaidableBases/Base_Loot and paste your edited list into the appropriate difficulty’s JSON file. Save and restart your server to apply.
Conclusion
Setting up the Raidable Bases plugin can feel overwhelming at first, but once you understand how to configure profiles, loot tables, and the many other settings, you gain full control over a well-built passive PvPvE system.
With the right setup, Raidable Bases keeps players on your server always moving — from beginner-friendly encounters to high-risk end-of-wipe attacks. If you run into issues, join our Discord and we’ll be happy to help.