
Installing Oxide on a Rust server is the first step for server owners who want full plugin support and deeper control over gameplay. Oxide is the most widely used Rust modding framework, allowing you to add plugins that improve moderation, quality of life, and server functionality.
In this guide, you will learn how to install Oxide on a Rust server using the proper installation method, ensure the correct version is applied, and verify that Oxide files and plugins are loaded correctly. We will also cover restarting the server, checking logs to confirm functionality, and managing plugins so your Rust server stays stable, updated, and ready for modded gameplay.
Installing Oxide On Your Rust Server
Through the Physgun Gamepanel:
To install Oxide on a Rust server through the Physgun Gamepanel:
-
Login to the Physgun Gamepanel.
-
Select your Rust server from the server list.
-
Click Stop to full shutdown your Rust server.
-
Navigate to the Server Options on the left side navbar.
-
Scroll down to the Modding Framework section
-
Click the dropdown and select oxide
-
Start your server and the most recent version of Oxide should now be installed!
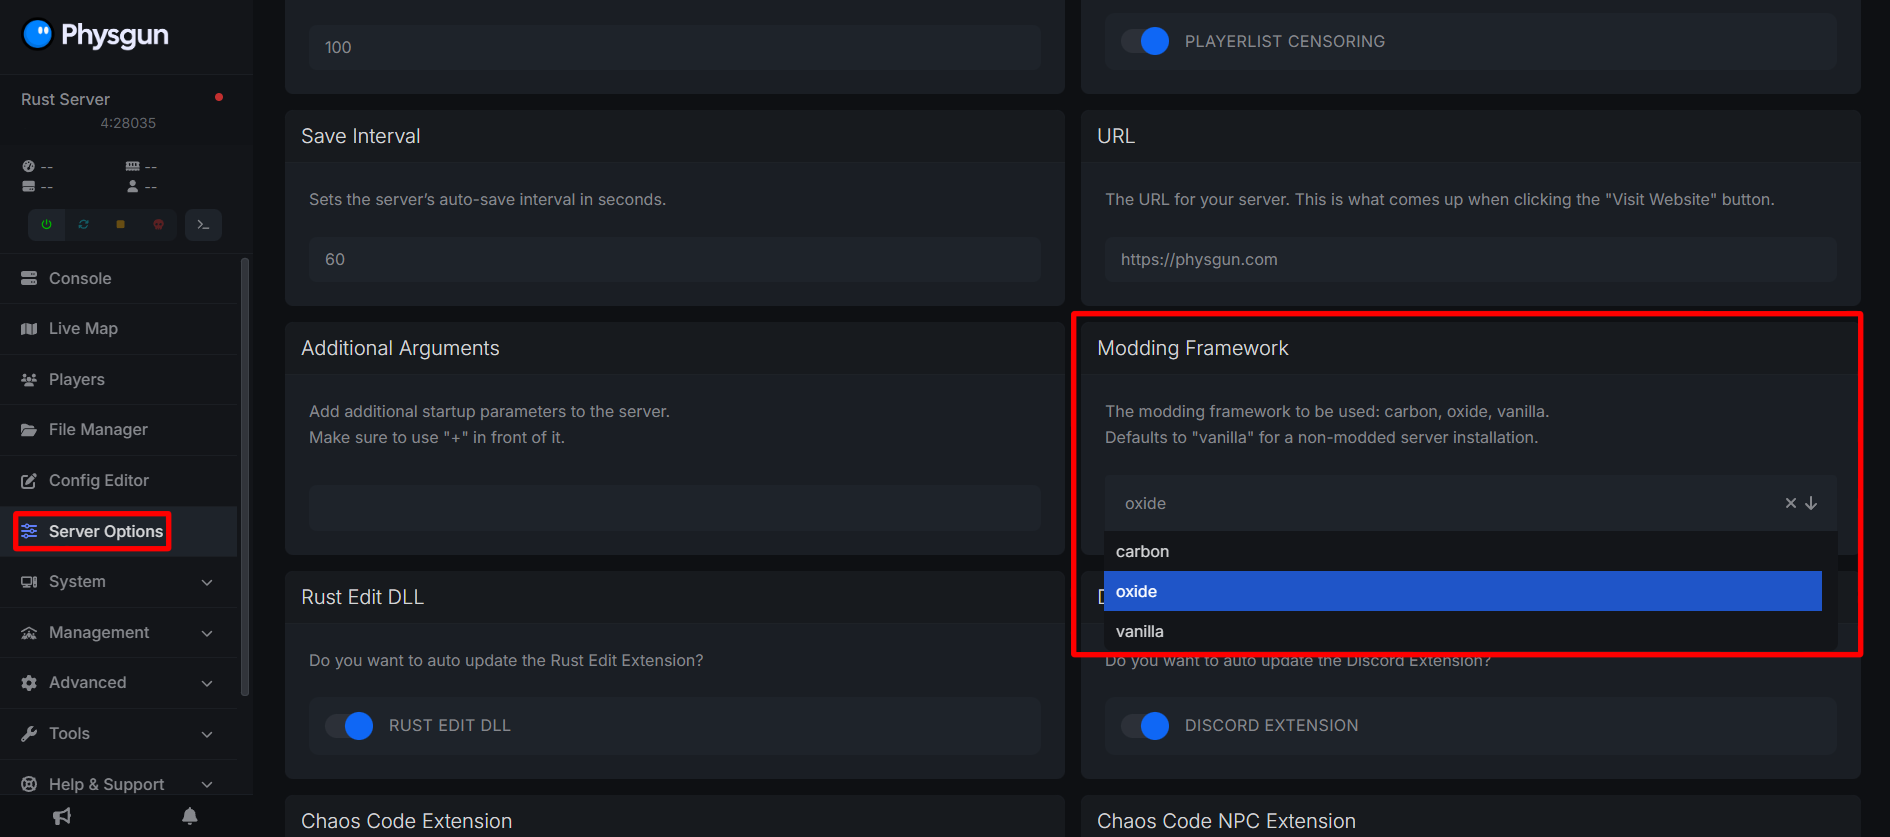
You can check that Oxide has been successfully installed by running the command oxide.version in the console. This will return the current version of Oxide your server is running.
Through A VPS Or Self-Hosted Server:
To install Oxide on a Rust server through a VPS or Self-Hosted Server:
-
Stop your Rust server completely.
-
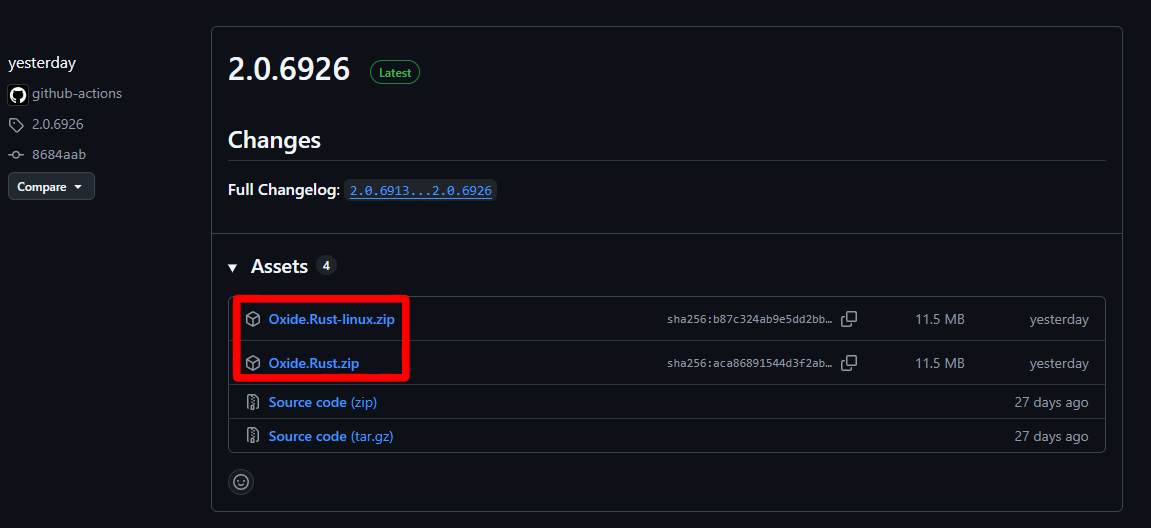
Visit the official OxideMod GitHub releases page.
-
Download the latest Oxide.Rust.Zip file for your operating system your server is on.
-
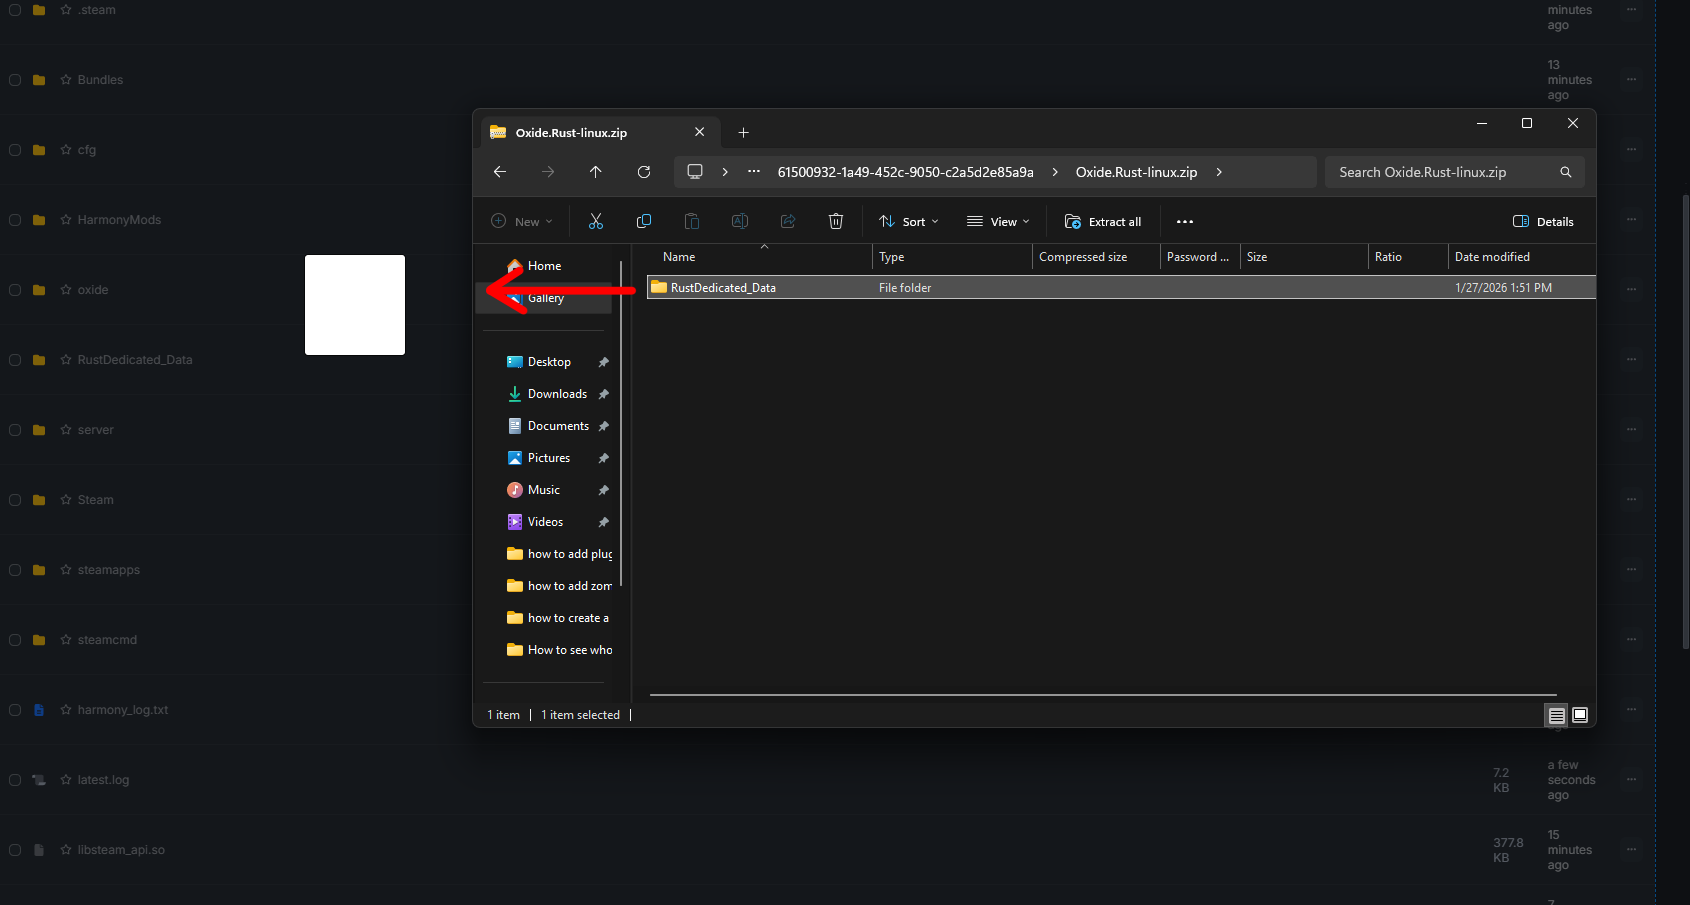
Extract the contents from the .zip file into a temporary directory.
-
Connect to your server using FTP, SFTP, or direct file access.
-
Upload all of the extracted files directly into the main Rust server directory.
- Allow files to overwrite existing files if prompted.
-
Start your Rust server and the most recent version of Oxide should now be installed!
You can check that Oxide has been successfully installed by running the command oxide.version in the console. This will return the current version of Oxide your server is running.
Adding Oxide Plugins To A Rust Server
Through The Physgun Gamepanel:
To add Oxide plugins to a Rust server through the Physgun Gamepanel:
-
Navigate to the Physgun Gamepanel.
-
Click on your Rust server from the list of servers.
-
Find Tools > Plugin Installer on the left side navbar.
-
Find a plugin you’d like to install, either through the search bar, or by discovering one through the long list of plugins from uMod and Codefling.
-
Simply click the install button and the plugin is now installed!

After you install your plugin, you can reload Oxide in the game server console by running oxide.reload and the plugin will now be ready to use!
Through a VPS Or Self-Hosted Server:
To add Oxide plugins to a Rust server through a VPS or Self-Hosted Server:
-
Find a and download the plugin you’d like to install on websites like uMod or Codefling.
- Mod files for Rust are usually the .cs file format
-
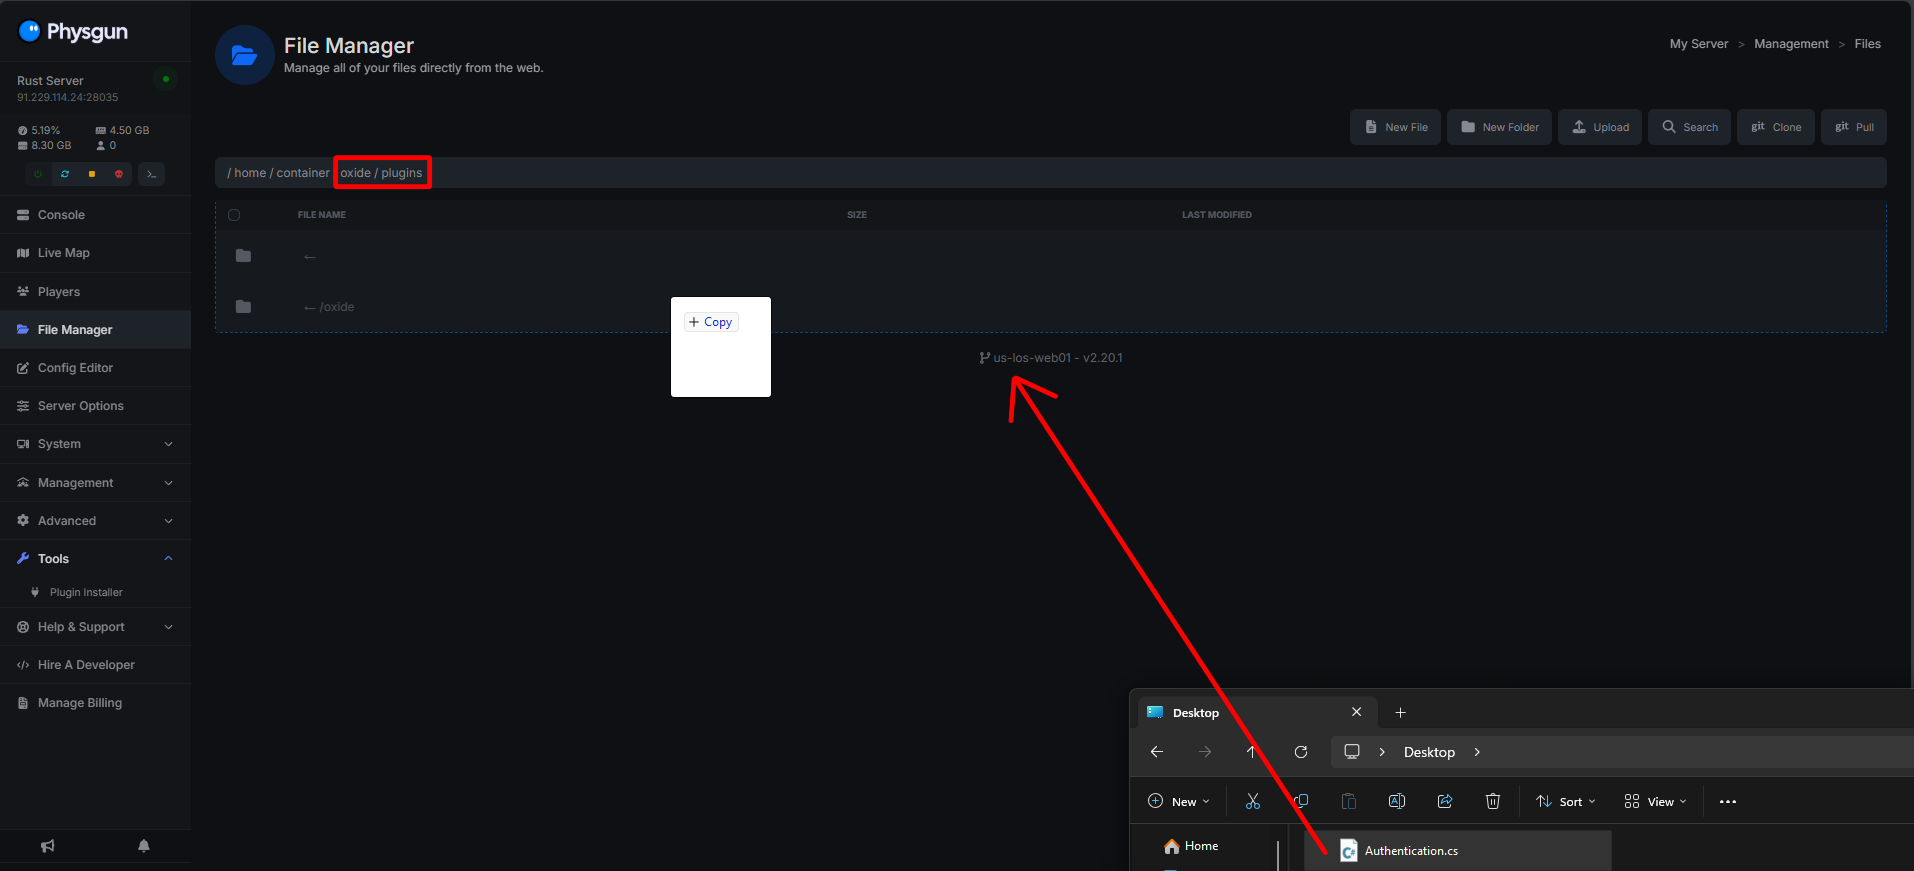
Connect to your server via FTP, SFTP, or direct file access.
-
Navigate to oxide/plugins in your server files.
-
Upload your plugin file
-
The plugin is now installed!
After you install your plugin, you can reload Oxide in the game server console by running oxide.reload and the plugin will now be ready to use!
Removing Oxide Plugins From A Rust Server
To remove Oxide plugins from a Rust server:
-
Stop your Rust server.
-
Navigate to the oxide/plugins directory
-
Delete the plugin file you would like to remove.
- Rust plugin files are usually in the .cs file format.
-
Once the file has been removed, restart your Rust server.
You can also remove plugins using the command oxide.unload PluginName in the game server console, where PluginName is the name of the plugin you’d like to remove.
Updating Oxide On A Rust Server
If you host your Rust server through Physgun, Oxide will be automatically updated whenever there is a stable release!
To update Oxide on a Rust server that is self-hosted or through a VPS:
-
Stop your Rust server.
-
Download the latest version of Oxide from their official GitHub releases.
-
Upload the new folder/files from the downloaded .zip file into your Rust server directory
-
Start your rust server and the most recent version of Oxide should be installed!
You can make sure your server is on the most recent version by checking the most recent version in the GitHub releases and comparing it with your server by running oxide.version in the game server console.
Keeping your Rust server on an outdated version of Oxide can break compatibility with some plugins. Always update Oxide after Rust updates to ensure plugin support and server stability.