Typing in chat mid-combat has never been ideal, and Simple Voice Chat fixes that by adding proximity voice chat directly to your Minecraft server. Players within range can hear each other naturally; the further away someone is, the quieter they sound, which adds a layer of immersion that completely changes how multiplayer feels. Getting it running takes a few steps on both the server and client side, and there’s a UDP port requirement that catches a lot of people off guard. This guide covers installation, server setup, voice chat settings, and how to get group chats working too.
Installing Simple Voice Chat on Your Server
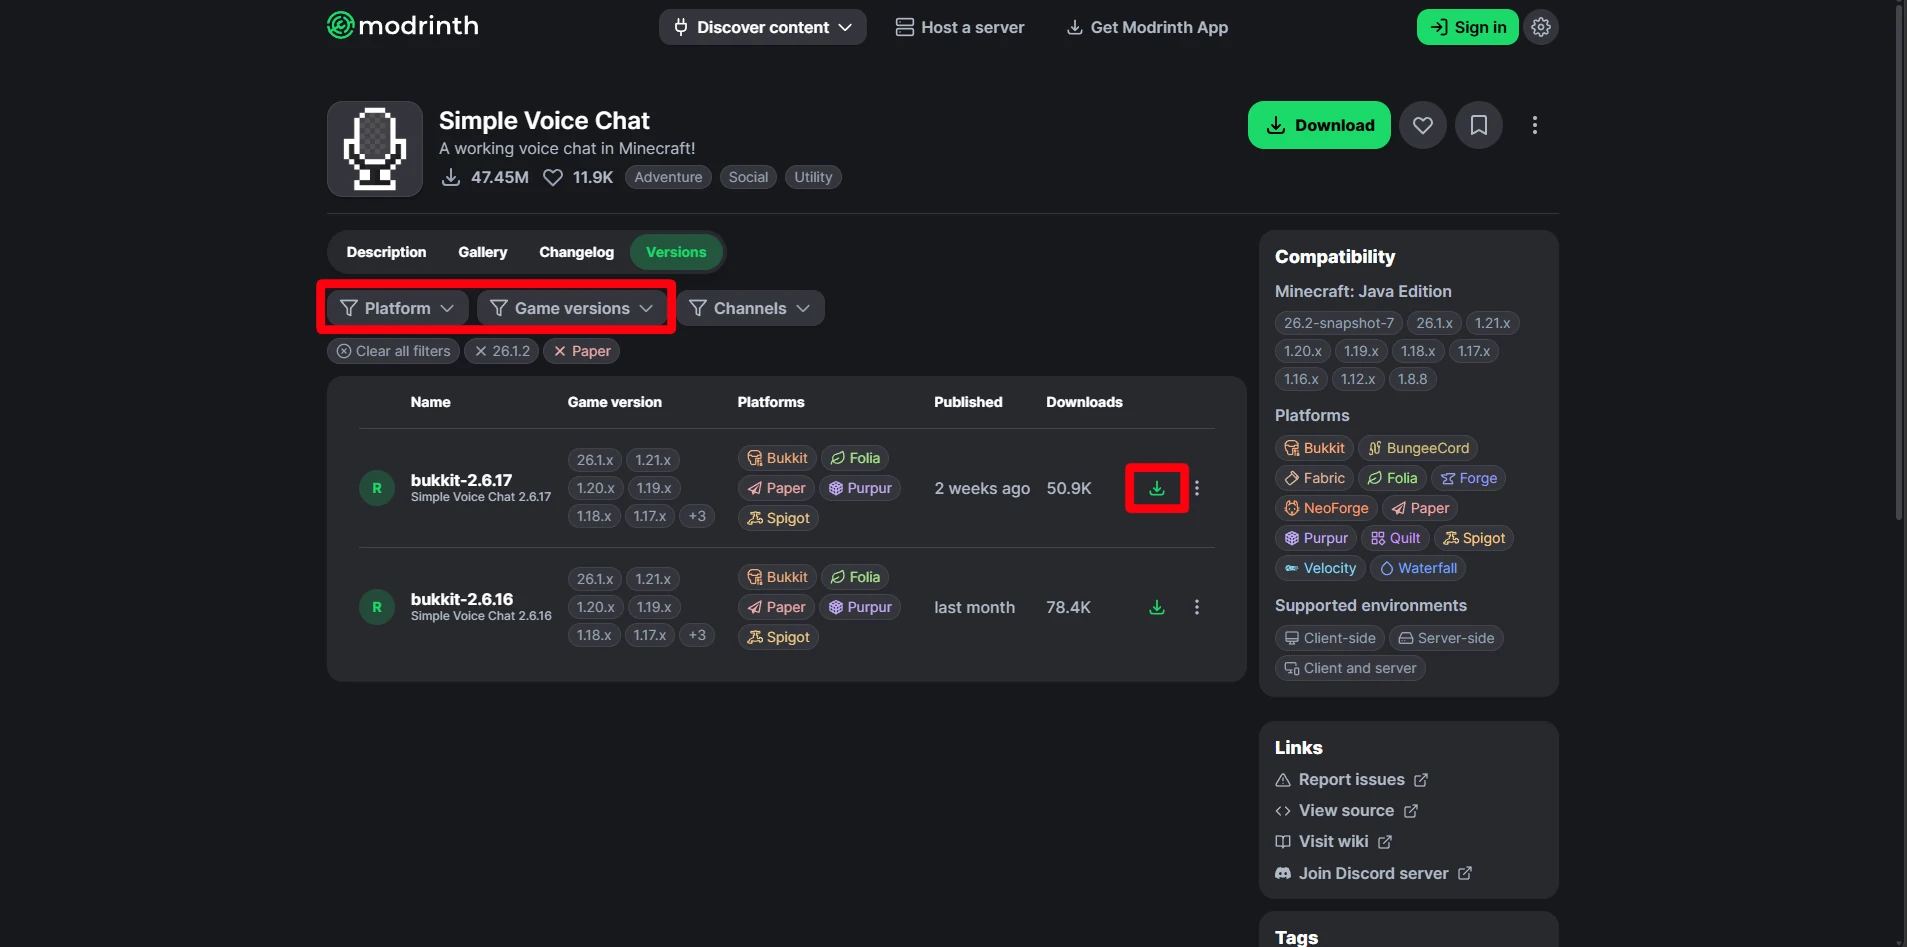
Pick the right build
Every release of Simple Voice Chat is tied to a specific Minecraft version and loader. Before you download anything, check that the mod’s version matches:
-
Minecraft version - 1.21, 1.20.4, etc.
-
Loader - Fabric, Forge, NeoForge, or the Paper/Spigot plugin variant.
Mixing a 1.20.2 Forge jar with a 1.21 Fabric server will only produce errors in the console.
You can download Simple Voice Chat here.
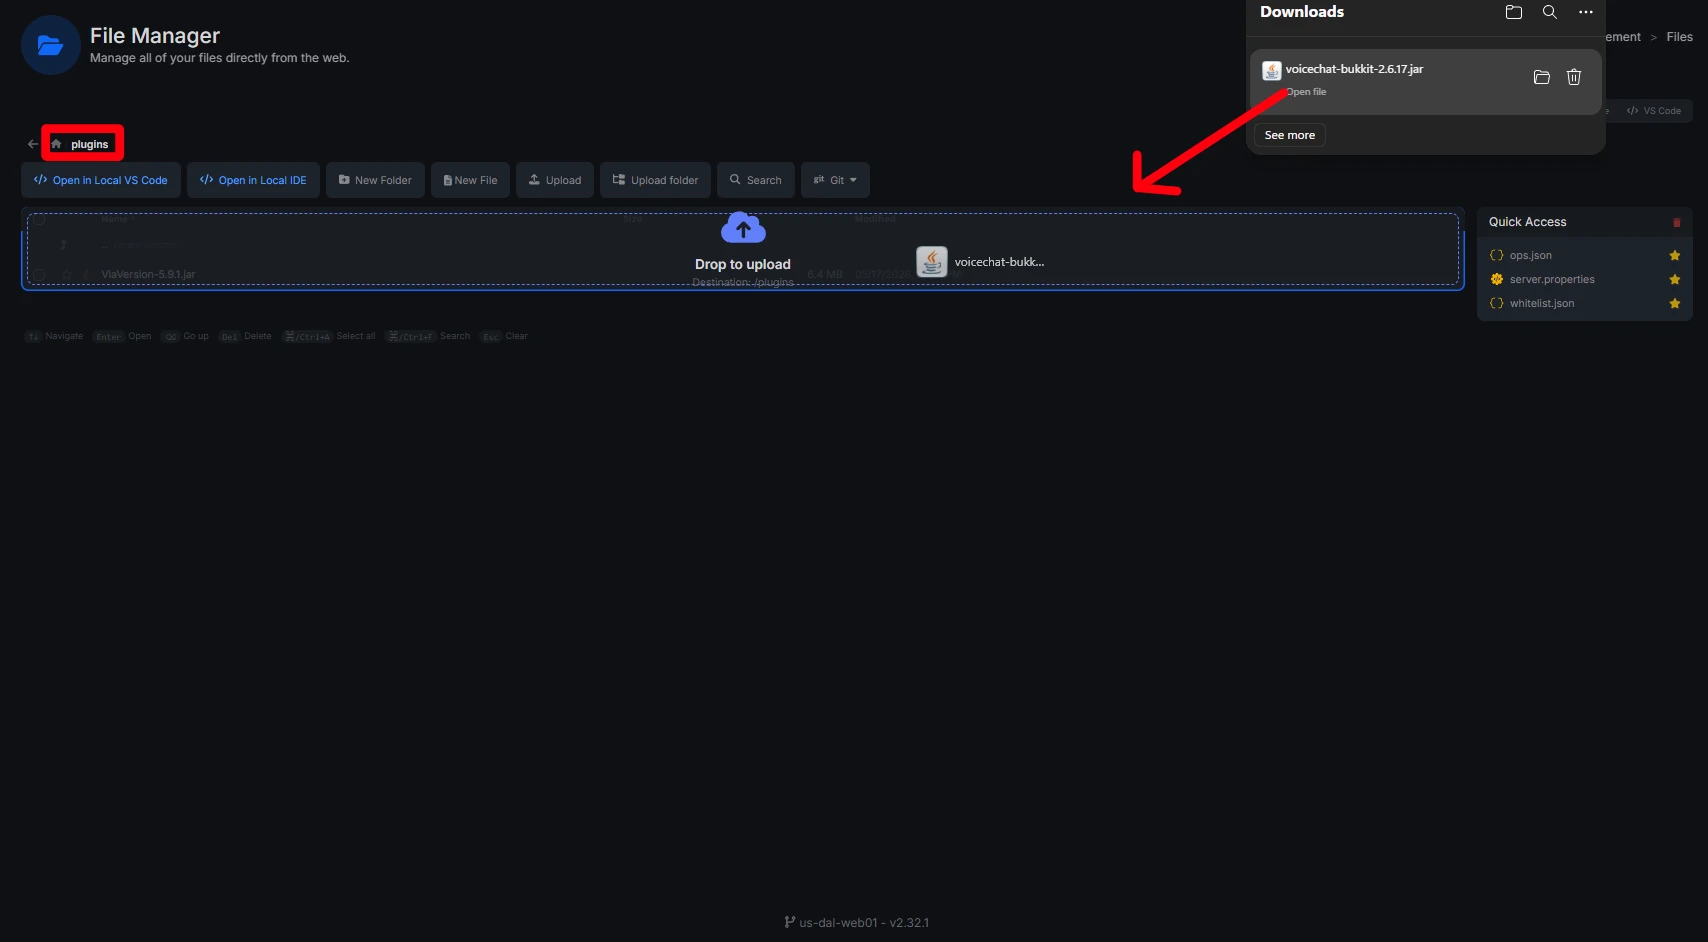
Drop the file in the proper folder
-
For modded servers (Fabric, Forge, NeoForge) place the .jar inside the mods directory.
-
For vanilla‑based servers using Paper or Spigot, copy the plugin jar to plugins.
# Example paths
mods/simplevoicechat.jar
plugins/simplevoicechat.jar
After the file is in place, restart the server so the mod can generate its configuration folder.
Verify the mod loaded
When the server boots, the console should display a line similar to:
[Simple Voice Chat] Loaded version 2.4.0 for Minecraft 1.20.4If you don’t see that, double‑check the file location and the loader version.
Configuring the UDP Voice‑Chat Port
Why UDP matters
Minecraft itself talks over TCP on port 25565, but voice data travels via UDP to reduce latency. Simple Voice Chat defaults to 24454/UDP. If that port is blocked by a firewall or not forwarded on your router, the client will stay disconnected even though the mod is installed correctly.
Warning: Opening only the Minecraft TCP port is insufficient; the UDP port must be reachable from the internet.
Editing the server config
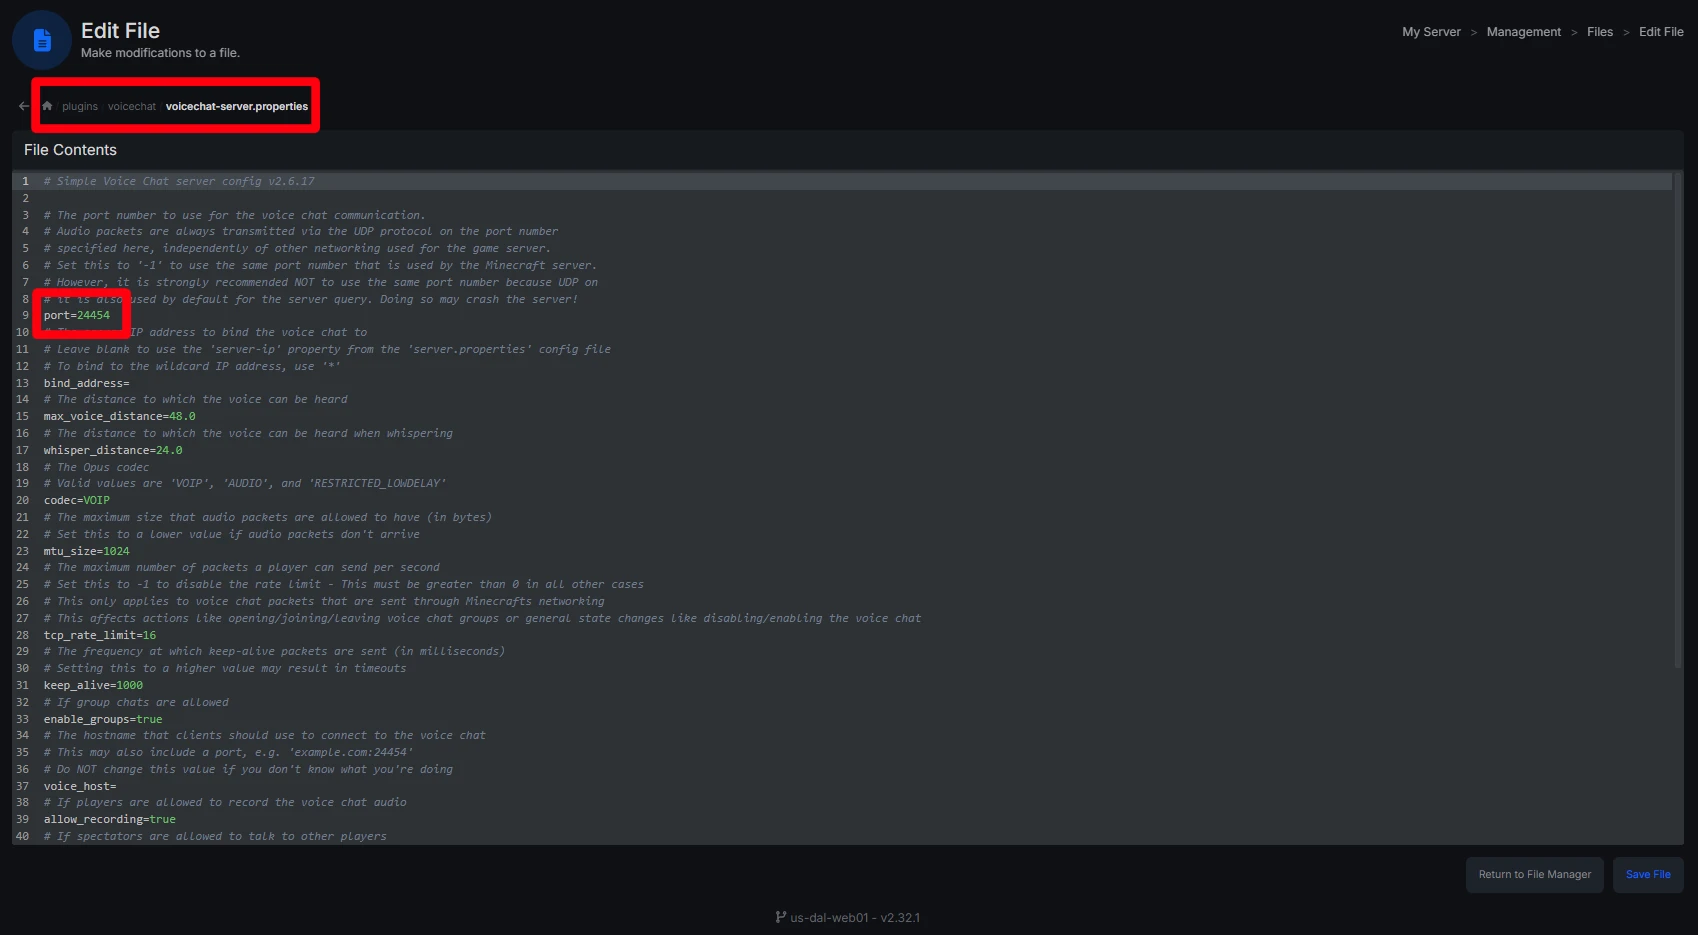
The mod creates plugins/voicechat/voicechat-server.properties. Open it with any text editor and look for the following lines:
port=24454
bind_address=-
port - change only if your host already uses 24454 for another service.
-
bind_address - leave blank to listen on all interfaces, or set a specific IP if the server has multiple NICs.
Port forwarding and firewall rules
-
Home‑hosted servers - log into your router, add a UDP forwarding rule from external 24454 to the internal IP of your Minecraft machine.
-
Hosted providers - many control panels let you allocate an extra UDP port; add 24454 and make sure the firewall rule allows inbound UDP traffic.
After adjusting the router or hosting panel, restart the server once more. The client should now report “Connected” once you join.
Getting the Client Mod Ready
Every player needs the same version
Voice chat works only when the client and server versions line up. If the server runs the 2.4.0 Forge build, each player must install the 2.4.0 Forge client mod (or the matching Fabric version, etc.). Mismatched builds usually result in a “Version mismatch” message in the voice‑chat overlay.
Installing via a launcher
Most popular launchers support mod installation with a few clicks:
-
CurseForge - search “Simple Voice Chat” and click Install.
-
Prism Launcher - add the mod from the Modrinth repository and enable it for your profile.
-
Modrinth App - find the mod, select the correct loader, and hit Install.
-
ATLauncher - locate the mod in the “Mods” tab and add it to your pack.
After the download finishes, launch Minecraft with the same loader you used on the server. The first launch will generate a voicechat folder inside your .minecraft directory.
Quick client‑side check
Press V (the default key) while in a world. If a small overlay appears showing microphone status, the client mod is active. If nothing happens, double‑check that the mod file is in the correct mods folder and that the loader matches the server.
Tip: Keep the client mod updated; newer releases often improve codec stability and add small QoS tweaks.
Server‑Side Settings That Matter
The voicechat-server.properties file controls more than just the port. Here are a few common tweaks:
# How far a normal voice can be heard (blocks)
max_voice_distance=48.0
# Whisper distance is a fraction of the normal distance
whisper_distance_multiplier=0.5
# How many packets per second are sent (higher = smoother, more bandwidth)
packet_size=1024
# Codec quality (0 = lowest, 5 = highest)
codec_quality=3-
Increase max_voice_distance for large survival worlds where players spread out.
-
Lower it for role‑play servers that want intimate conversations.
-
Adjust packet_size if players report choppy audio on high‑latency connections - a smaller size can help.
Remember to restart the server after any change; the mod only reads the file on startup.
Using the In‑Game Voice Chat Menu
Press V (configurable in the keybinds list) to open the Simple Voice Chat GUI. The menu offers:
-
Microphone selection - choose the device you want to broadcast from.
-
Output device - pick headphones or speakers for incoming voice.
-
Voice activation vs. push‑to‑talk - toggle the mode that suits your playstyle.
-
Group chat list - see existing private rooms and create new ones.
-
Test button - record a short sample to verify that the microphone works before joining a server.
The interface updates in real‑time; you’ll see a small icon next to your name when you’re speaking.
Setting Up and Using Group Chats
Group chats let you create private voice rooms that ignore proximity. To start one:
-
Open the voice chat menu (V).
-
Click Create Group and give it a name.
-
Invite friends with the command:
/voicechat invite <player>Invited players will see a pop‑up asking them to join the group. Once inside, everyone hears each other at full volume regardless of distance. This is perfect for coordinated raids, building projects, or simply chatting with friends who are far apart on the map.
Group chats persist across server restarts, so you can set up a “Team Alpha” room that’s always available.
Troubleshooting Common Problems
“Not Connected” after joining
-
Verify UDP port 24454 is open on the router or hosting panel.
-
Check that the firewall on the server machine allows inbound UDP.
-
Make sure the client mod version matches the server’s.
Microphone not detected
-
Open the voice chat menu and confirm the correct device is selected.
-
On Windows, go to Settings → Privacy → Microphone and ensure “Allow apps to access your microphone” is on.
-
Restart Minecraft after changing OS permissions.
Players can join but hear nothing
-
Confirm each player has the correct output device selected.
-
Double‑check that max_voice_distance isn’t set to an extremely low value.
-
Ensure no other software (e.g., Discord) is hogging the microphone exclusive mode.
Audio is garbled or delayed
-
Lower packet_size in the server config.
-
Reduce codec_quality if bandwidth is limited.
-
Verify that the server’s internet connection isn’t saturated with other traffic.
With the server and client correctly installed, the UDP port open, and a few tweaks to distance settings, Simple Voice Chat turns Minecraft’s silent blocks into a lively, immersive space where you can actually talk to the people you’re building with. Happy chatting!