Creating a GMod DarkRP server is one of the most popular ways to run a Garry’s Mod server, offering structured roleplay, jobs, money systems, and custom gameplay rules. Whether you are launching a new DarkRP server for friends or building a public roleplay community, the setup process follows a few critical steps.
In this guide, you will learn how to make a GMod DarkRP server, including how to install DarkRP, configure the DarkRP gamemode, and set up essential server files.
We will also cover installing addons, creating DarkRP jobs, configuring jobs and entities, and managing core DarkRP settings like money, spawn rules, and the F4 menu. By the end of this guide, you will have the knowledge to create a fully working DarkRP server with the foundations needed to support players, customize gameplay, and grow a stable Garry’s Mod roleplay community.
How To Install DarkRP On Your Garry’s Mod Server
To install DarkRP on your GMod server:
-
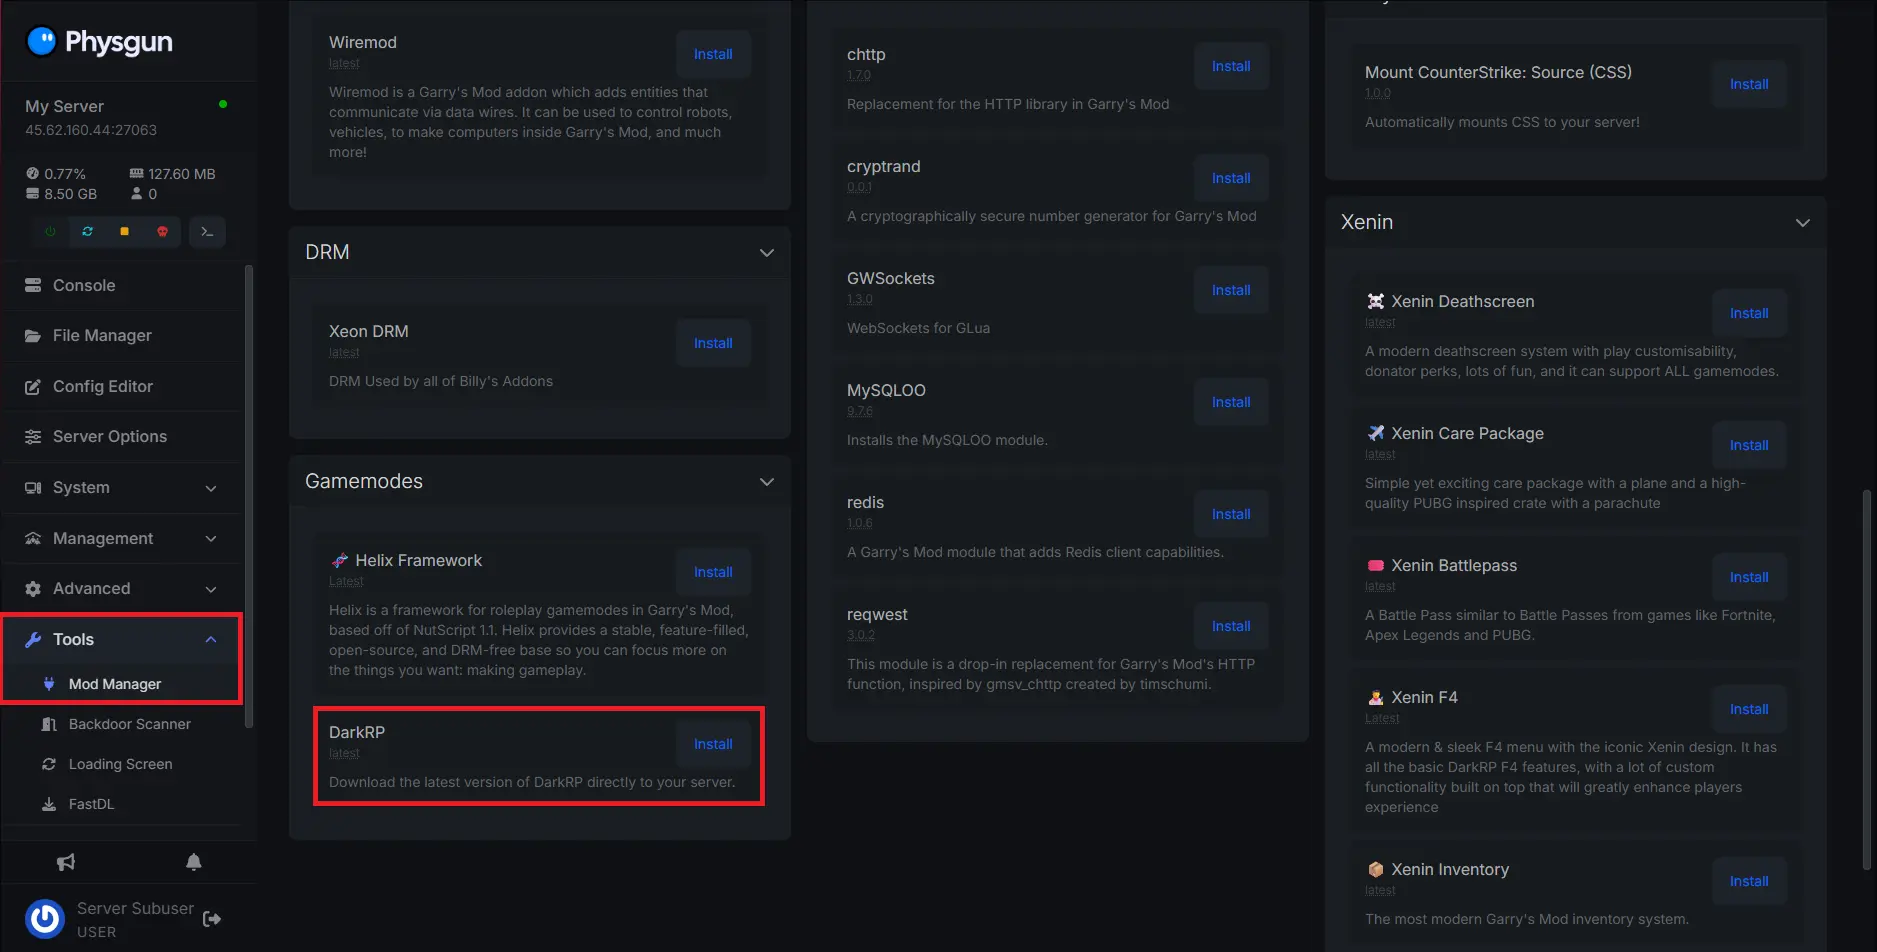
If you have a Physgun server, you can simply install DarkRP by navigating to the Mod Manager tab under Tools.
-
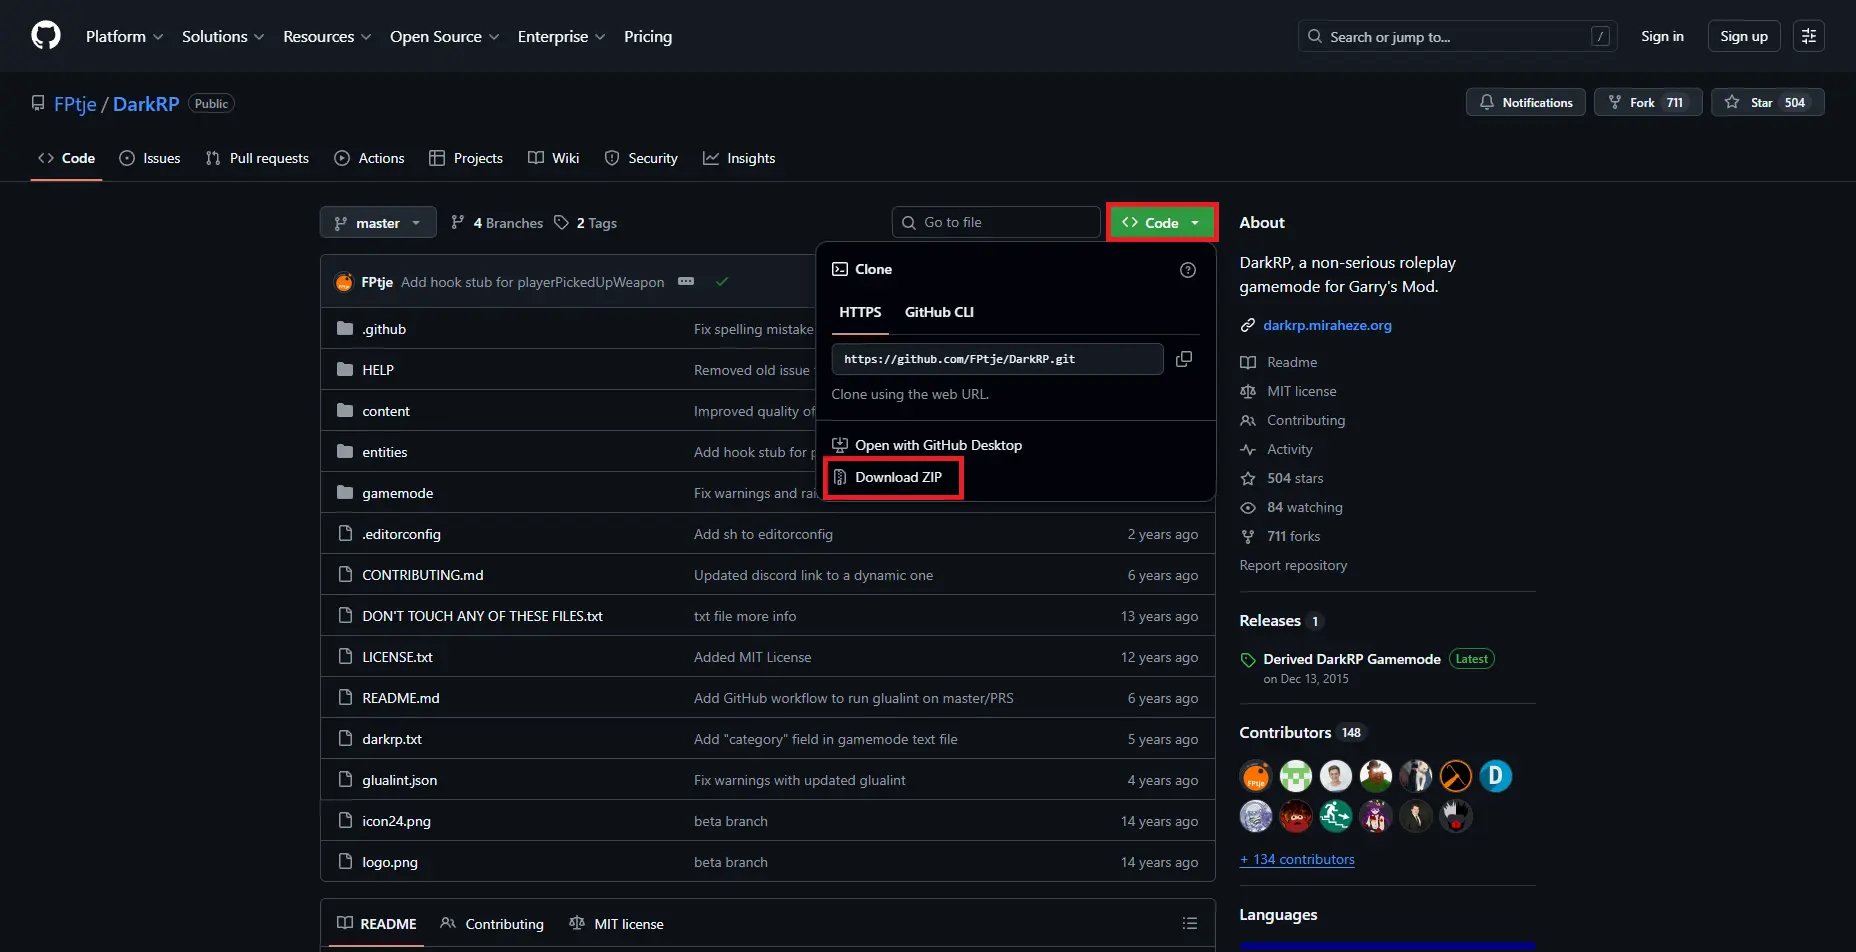
If you’re not a Physgun client, start by visiting the DarkRP GitHub page.
-
Navigate to the Code tab and click Download Zip.
-
Extract the zip file. You should receive a folder named darkrp.
-
Open your server’s file manager or navigate to your server’s main folder, depending on if you use a service or a dedicated server.
-
Paste the darkrp folder into your server’s gamemodes folder located in the garrysmod/gamemodes directory.
-
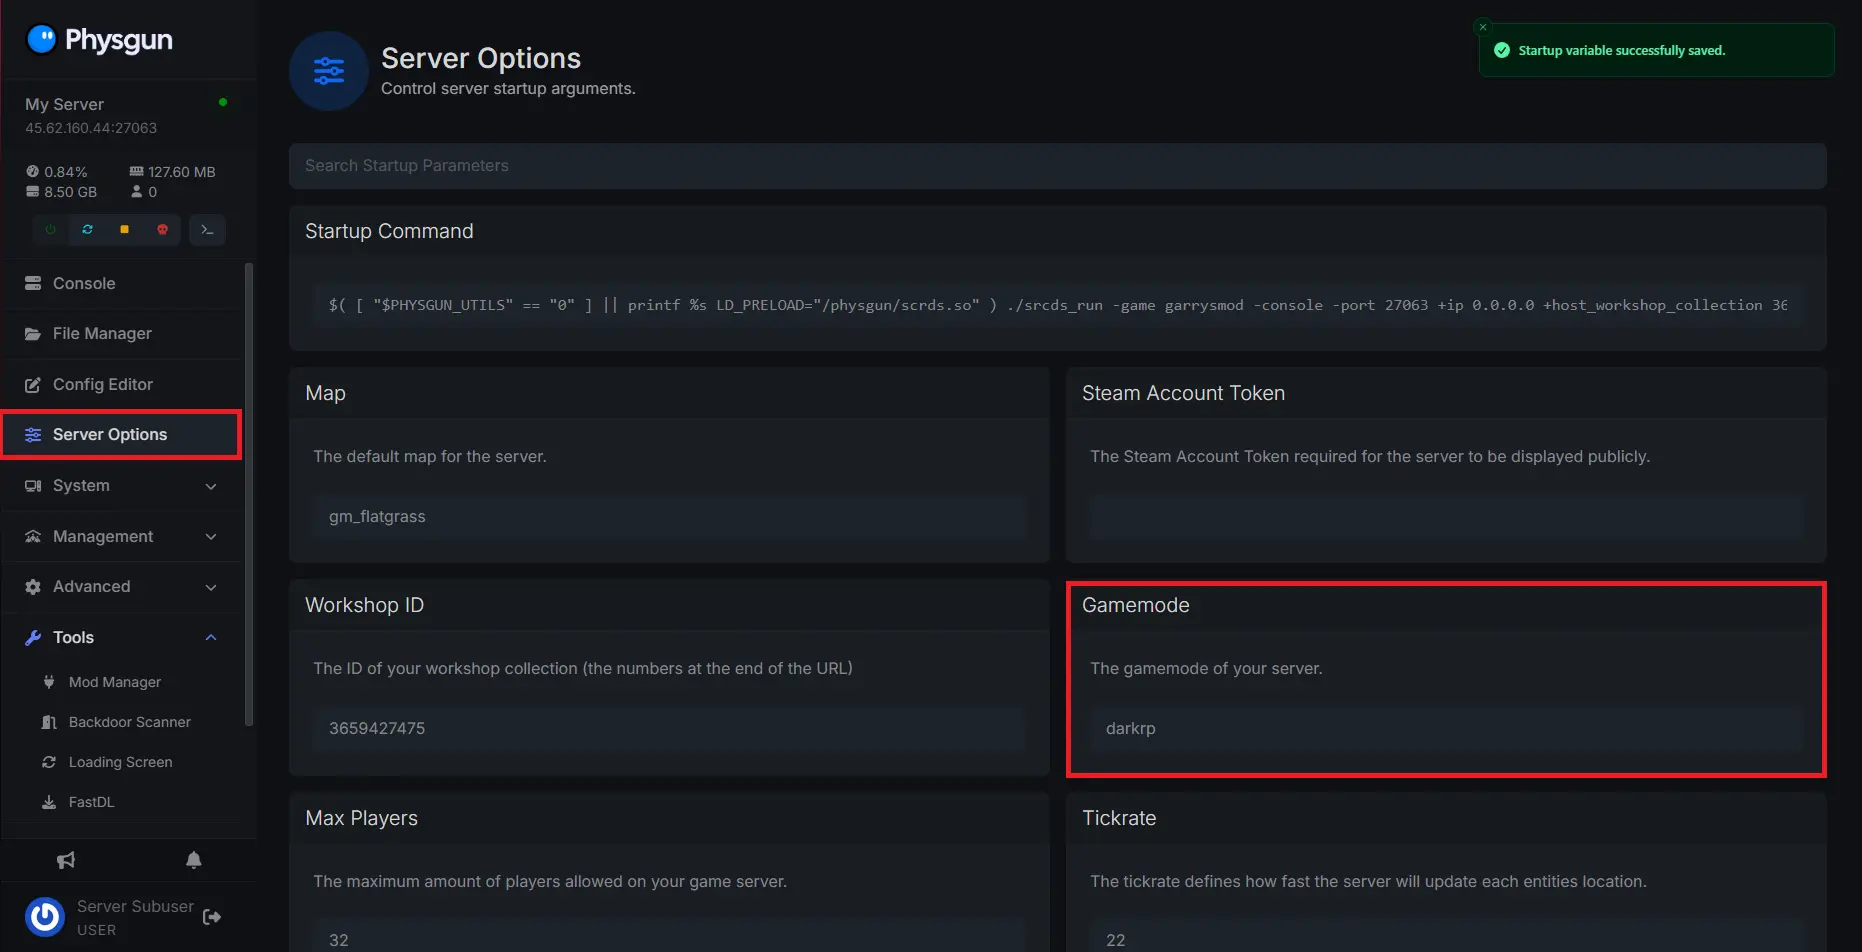
If you’re a Physgun client, navigate to the Server Options tab and find the Gamemode option.
Type “darkrp” into the box and restart your server.
If you’re instead using a dedicated server, open up your batch file, find the +gamemode option. By default, it should say sandbox. Change the value to “darkrp” and restart your server.

Once your server boots up, DarkRP should be installed!
Installing Addons For Your DarkRP Server
To install addons for your DarkRP server:
-
Open the Garry’s Mod workshop and ensure your server has a workshop collection.
-
Search for addons that fit your server’s needs, such as a map, admin system, or even entire jobs and systems to complement them.
-
Select the Add to Collection button for each addon you want to add to your server to add it to the content pack. Ensure that the addons you download will work in the DarkRP gamemode. Addons made for other gamemodes, such as Trouble in Terrorist Town or Prop Hunt, are unlikely to work on your server. Sandbox addons or addons unspecified for specific gamemodes will usually work just fine in DarkRP.

-
Additionally, you can visit the Gmodstore to obtain addons that are higher quality, but require you to spend money. These addons have to be manually installed into your server’s files.
-
Find the addon or addons you want to install. Purchase and download them to your computer.

-
Extract the zip file and move the addon files into your server’s addon folder located in the garrysmod/addons directory.

-
There is one specific addon you will need to run a DarkRP server: the DarkRP Modification Master. This addon allows you to add items to your server, create all the jobs, and configure the basic settings of the gamemode.
-
If you are a Physgun client, you can find the addon in the Mod Manager tab.

-
Otherwise, visit the addon’s GitHub page and download it the same way you did the gamemode.
-
Install the modification addon into your server’s addon folder, as explained in steps 5 and 6.
-
With that, you know how to install addons onto your DarkRP server and can now configure the gamemode.
How To Add Categories To Your DarkRP Server
To add categories to a DarkRP server:
-
Before you start adding your jobs or other aspects to your DarkRP server, you’ll have to create categories to put them in.
-
Navigate to your darkrpmodification addon and open the categories.lua config file located in the darkrpmodification/lua/darkrp_customthings directory.
-
The following code is a sample template for you to use when creating a category, including notes that explain each field.
DarkRP.createCategory{
	name = "Example", -- Determines the category name that appears in-game.
	categorises = "jobs", -- What does this category contain? Choose between jobs, entities, shipments, weapons, vehicles, or ammo
	startExpanded = true, -- Should this category be expanded by default? Most F4 menu addons will overwrite this field.
	color = Color( 255, 255, 255, 255 ), -- The color in which your category appears as.
	canSee = function( ply ) return true end, -- OPTIONAL!!! A lua function that returns whether or not a player should be able to see this category or its contents.
	sortOrder = 1, -- What order, in relation to other categories, should this one appear. Lower numbers appear first.
}-
Paste the example into your categories.lua file and fill out the information so it fits your server’s needs.
-
Save the file and move on to the next steps.
-
Now that you have a category made, you can go ahead and create entities, shipments, or jobs to put in it.
How To Add DarkRP Jobs To Your DarkRP Server
To add jobs to a DarkRP server:
-
Open up your darkrp_customthings folder again and view the jobs.lua file.
-
Below is another sample template for you to use when creating a DarkRP job.
TEAM_GUY = DarkRP.createJob( "Some Guy", { -- TEAM_ refers to the unique id this job will use. This should be different for each job otherwise, it will lead to problems in the future. The value in quotes on this line is the name that appears in-game.
    color = Color( 255, 255, 255, 255 ), -- The color in which the job should appear
    model = { -- A table containing a list of model options for the job
        "models/player/Group03/Female_01.mdl",
        "models/player/Group03/Female_02.mdl"
    },
    description = [[Just a guy, a guy who does guy things.]], -- How should your job be described in the F4 menu
    weapons = { "weapon_fists", "weapon_physgun", "gmod_tool" }, -- A table containing the weapon ID for each item this job should spawn with.
    command = "theguy", -- What command can players use to quickly switch to this job (THIS MUST BE UNIQUE FOR EACH JOB OR IT WILL BREAK)
    max = 15, -- How many people can play on this job at once. A whole number will determine a flat maximum, but a decimal will specify what percent of the online population can play the job at once.
    salary = 80, -- How much money does a person make on this job
    admin = 0, -- Does the player need to be an admin to access this job
    vote = false, -- Should joining this job require a vote among other players
    hasLicense = false, -- Does this job have a weapon license
} )-
Other fields can be added to a DarkRP job, but are usually left untouched. You can find them on the DarkRP Wiki.
-
Paste the example into your jobs.lua file and make any necessary edits.
-
Save the file and restart your server.
-
When you load in, you should see your new DarkRP job or jobs are added, playable, and under the correct category when you open the F4 menu.
-
If you load in and get errors, or your playermodel appears grey, check your console to find the source of the error.
How To Add Entities To Your DarkRP Server
To add entities to a DarkRP server:
-
Once again, return to your darkrp_customthings folder and open the entities.lua file.
-
Here, you can add entities to your server that can be purchased in the F4 menu. Note that there’s a difference between entities and shipments. Entities include money printers, drug labs, or tip jars, while shipments exclusively include weapons like an M16, grenades, or a Desert Eagle.
-
Below is an example of how to create a DarkRP entity.
DarkRP.createEntity( "Example Ent", { -- Includes the display name of the entity. ent = "ent_example", -- The entity id to spawn model = "models/props_c17/consolebox01a.mdl", -- The model of the entity price = 1000000, -- The cost of the entity in the F4 menu max = 1, -- How many of this entity can one player spawn at a time cmd = "buyexampleent", -- What command is used to quickly buy this entity allowed = { TEAM_GUN, TEAM_MOB }, -- What jobs are allowed to spawn this entity } ) -
Like the job example, there are other fields that can be found on the DarkRP Wiki, but aren’t necessary to create an entity.
-
Paste this template into your entities.lua file and change it as needed.
-
When you load into your server, open the F4 menu and navigate to the entities tab. You should see the entity or entities you’ve created under the category you made for them!
With all of this information, you now know how to install and configure DarkRP for your Garry’s Mod server! You can also apply your knowledge at this point to edit the ammo, food, and weapon files, as well as door and chat groups, among other stuff, too. You should also check out the settings.lua file to change options such as default laws, income rates, events, and game rules. The disable_defaults.lua file also allows you to enable or disable certain preset classes or entities that are built into DarkRP.