
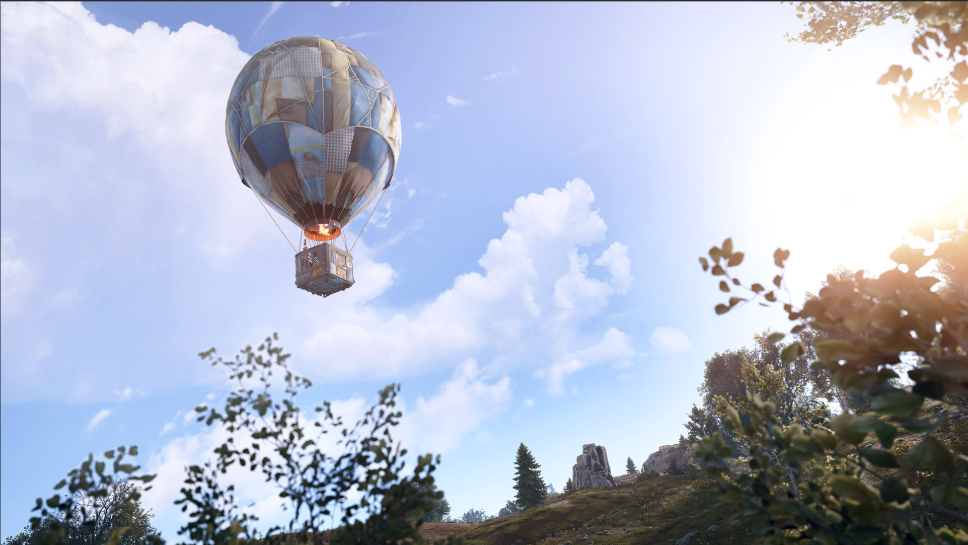
The hot air balloon in Rust is one of the more unusual ways to get around the map: slow, loud, and visible from a long way off, but genuinely useful for scouting, repositioning, or just getting somewhere without running into every player on the server. Flying one takes a bit of practice. You need low grade fuel to get airborne, and controlling altitude and direction is done through the flags located around the balloon's basket. Keep in mind the balloon spawns randomly across the map, needs to be fully repaired before takeoff, and SAM sites will make short work of it near certain monuments. This guide covers everything you need to get up, navigate, and land without losing the balloon or your loot.
What Do You Need To Fly The Hot Air Balloon?
Flying the hot air balloon isn’t as simple as hopping in and pulling a lever. You must gather specific resources and locate a functional (but likely damaged) balloon first. Alternatively, players can purchase a Hot Air Balloon at the Air Wolf Vendor inside the Bandit Camp monument for 150 Scrap, which includes 75 Low Grade Fuel.
Hot air balloons can spawn at various locations across the map, but if you prefer crafting, you’ll need to collect blueprint fragments, cloth, and propane tanks. These crafting materials are typically found at Balloon Sites, which are marked by distinctive launch towers.
Before taking off, ensure the balloon is fully repaired. Use a hammer and cloth to restore its health, with each hammer swing providing a small percentage per hit to repair. A balloon is fully repaired when its health is at maximum, which is crucial for maintaining speed and preventing flight failure.
The Hot Air Balloon can hold up to 500 Low Grade Fuel at any given time, which is the default maximum stack size. Each purchased Hot Air Balloon comes with 75 Low Grade Fuel, providing just over 6 minutes of thrust when burned. Low Grade Fuel is consumed at a rate of 1 fuel per 5 real-world seconds, and only while the burner is active.
Locating and Preparing the Balloon
Spawn Locations: Balloons spawn randomly at specific monument-adjacent locations across all official map types (Procedural Map, Hapis Island, etc.). Common spawn points include near the Dome, Launch Site, Airfield, and Power Plant. They do not spawn near the Military Tunnel due to the active SAM site. Always approach cautiously, as balloons are high-value targets often camped by other players.
Balloon Structure: The fabric bag that holds the hot air in a balloon is called the envelope, and it is typically made of nylon or polyester.
Control Flags: Navigation flags are located around the hot air balloon basket to help guide your direction and understand your surroundings relative to the balloon's location.
Repair Requirement: Balloons spawn in a damaged state (typically 50-70% health). You cannot take off until it is at 100% health. This requires:
Repair Hammers: The primary tool. Each swing repairs a small percentage. Be prepared to use 10-20 hammers depending on initial damage.
Alternative Repair: While inefficient, you can use a Workbench Level 1 with the /repair command targeting the balloon (/repair hot_air_balloon), but this consumes significant resources (200 Cloth, 100 Low Grade Fuel per 1% repair) and is impractical mid-game without a dedicated setup.
Essential Fuel: Low Grade Fuel (LGF) is the only fuel source for the burner. You need a substantial amount:
Minimum Takeoff: Roughly 500-700 LGF to achieve and stabilize initial lift from the ground.
Sustained Flight: Fuel consumption is constant while the burner is active. Plan for at least 1500-2000 LGF for any meaningful flight duration (10-15 minutes). Running below 30% fuel mid-flight risks a catastrophic, uncontrolled descent.
Storage: Bring fuel in backpacks or a storage box placed inside the basket before takeoff. Refueling mid-air is impossible.
Critical Pre-Flight Checks
Full Repair: Verify health is 100% via the context menu (E by default). If the health bar gets close to zero, the balloon's movement will be severely hampered or may stop entirely, so repair before flight.
Fuel Load: Ensure sufficient LGF is loaded into the burner’s inventory slot (accessible via the basket context menu). The burner holds 2000 LGF max.
Cold Inflation: Before heating the envelope with the burner, cold inflation uses a gasoline-powered fan to blow cold air into the envelope.
SAM Site Awareness: Crucially, avoid the Military Tunnel monument. The active SAM site there will automatically target and destroy the balloon within seconds of entering its large engagement radius, regardless of altitude or health. Plan routes accordingly.
Threat Scan: Perform a thorough 360-degree scan for players, turrets, or potential sniper positions before igniting the burner. The loud burner sound attracts attention rapidly.

How To Fly The Hot Air Balloon
Once repaired and fueled, flying involves mastering the basket’s control flags and understanding environmental factors. To board the balloon, look up press E or simply press E to enter and initiate takeoff. To fly the hot air balloon, players must engage the burner to ascend and release it to descend, using directional keys to navigate. The hot air balloon requires low-grade fuel to operate, consuming 4 fuel to take off and 5 fuel every 30 seconds during flight.
Forget joysticks; Rust’s balloon uses a physics-based, wind-dependent system. You use the flags located around the hot air balloon to control direction and altitude. To make the flag point in the direction you want the air balloon to go, interact with the flags and enable thrust and turn as needed. Sometimes, you may need to press the flags multiple times to enable or times to enable thrust for proper maneuvering around the hot air balloon. Gaining altitude is your best bet to escape threats like SAM sites.
Ideal wind limits for launching hot air balloons are between 4–6 mph, and flights are often canceled if surface winds exceed 8–10 mph. Balloonists must adhere to Visual Flight Rules (VFR) and can only fly when visibility is high enough to see and avoid obstacles. Pilots also check weather conditions for wind speed and direction at different altitudes before flight.
Basic Controls & Physics
The basket features four distinct flags, each controlling a specific axis. Interaction is done by looking at the flag and pressing the use key (E). Additionally, the red button is used to initiate takeoff and to adjust thrust during flight—press it multiple times to control ascent and maneuver the hot air balloon:
Left/Right Rotation Flags (Red/Yellow): Located on the sides of the basket.
Function: Rotates the entire balloon assembly horizontally (yaw). This does not directly change your direction of travel but aligns the balloon’s orientation relative to the wind.
Usage: Pressing the left flag spins counter-clockwise; right flag spins clockwise. Hold for faster rotation. This is vital for positioning the balloon correctly before attempting to gain/lose altitude relative to the wind direction.
Up/Down Altitude Flags (Blue/Green): Located at the front/rear of the basket.
Function: Controls the burner (Up/Blue) and vent (Down/Green).
Burner (Up Flag): Ignites the flame, heating the air inside the envelope, causing lift. Crucially, the burner has a 15-second cooldown after each use. You cannot hold it down; you must spam the flag every 15 seconds to maintain or gain altitude. Each activation consumes 50 LGF and provides lift for approximately 8 seconds. The red button can also be used to toggle thrust and start your journey.
Vent (Down Flag): Opens the top vent of the envelope, releasing hot air and causing a rapid descent. Also has a 15-second cooldown. Use sparingly to avoid crashing.
Specialized instruments in hot air ballooning include a variometer to measure climb/descent rate, an altimeter to measure height, and a pyrometer to monitor envelope temperature.
Mastering Flight
Initial Lift-Off:
Stand in the center of the basket.
Face the direction you want the balloon to face (using Left/Right flags if needed).
Spam the Up (Blue) Flag. The burner ignites, consuming fuel, and the balloon rises slowly. Continue spamming every 15 seconds.
As you prepare for lift-off, always perform a comprehensive pre-flight equipment inspection to ensure safety.
Controlling Altitude:
Gaining Altitude: Spam the Up Flag consistently. Higher altitudes generally mean stronger, more predictable winds.
Maintaining Altitude: Time Up Flag presses so the burner activates just as the previous lift effect ends. Requires practice to match the 8-second lift duration with the 15-second cooldown (roughly every 13-14 seconds in practice).
Losing Altitude: Spam the Down (Green) Flag to vent air. Use short bursts for controlled descent; holding it too long causes a dangerous, rapid drop. Stop venting ~20-30m above ground and use the burner to cushion landing.
For safety, always fly in calm winds when possible.
“Steering” (The Wind is Your Pilot):
This is the most critical concept. The balloon cannot move horizontally under its own power against the wind. Your horizontal movement is 100% dictated by the current wind speed and direction at your altitude.
Rotation is Key: Use the Left/Right flags to rotate the balloon so its front (where the Up flag is) points in the direction you want the wind to carry you. If the wind is blowing North, rotate so the front points North to travel North. Point South to travel South. You are aligning yourself with the wind vector, not steering like a car.
When navigating, you must maneuver around the hot air balloon to align with wind currents and use the flags located around the hot air to make the flag point in your desired direction.
Altitude = Different Winds: Wind direction and speed often change significantly at different altitudes. Climbing or descending (using Up/Down flags) is your primary method to find a wind current going in your desired direction. Experiment by changing altitude in 20-50m increments.
Landing Safely:
Identify a clear, flat landing zone well in advance (balloons are fragile on impact).
Begin descent 100-150m out from your target, using controlled bursts of the Down Flag.
As you near the ground (within 30m), stop venting and start spamming the Up Flag to slow your descent dramatically. Aim for a near-hover just above the ground.
Cut the burner (stop spamming Up Flag) just before touchdown for the softest landing. Hitting the ground while burner is active causes significant bounce/damage.
Critical: Land away from your intended destination if possible. The loud burner noise during landing attracts players; land in a bush or behind terrain, then run the last 50m.

How Many Bullets Does It Take To Shoot Down The Hot Air Balloon?
The hot air balloon has a fixed total health pool. Destroying it requires inflicting exactly 500 damage. As the balloon takes damage and its health reduces, health reduces it's speed, and if the health is low, it reduces it's speed drastically, potentially making it immobile when the health bar gets close to zero. This translates directly into specific numbers of bullets based on weapon damage per shot, making defense and attack calculations straightforward. When a Hot Air Balloon is destroyed, all fuel inside is lost and the loot container drops to the ground, accessible by any nearby player, so be cautious of losing valuable resources.
Damage Breakdown by Weapon Type
The balloon’s health pool is static. Below is a definitive table based on Rust’s weapon damage values (verified across multiple patch updates up to 2026):
Weapon Type | Damage Per Shot | Shots to Destroy | Practical Reality Notes |
|---|---|---|---|
LR-300 / AK | 10 | 50 | Most efficient common assault rifle. |
MP5 | 9 | 56 | Slightly less efficient than rifles. |
M249 | 15 | 34 | Very fast destruction due to high RoF. |
Eoka Pistol | 25 | 20 | Highly inefficient (ammo cost), but works. |
Bolt Action Rifle | 150 | 4 | Extremely fast takedown from skilled aim. |
Shotgun (1 pellet) | 5 | 100 | Requires multiple shells; impractical. |
Rocket / C4 | 500+ | 1 | Instant destruction. |
SAM Site (Military Tunnel) | 500+ | 1 | Guaranteed destruction within engagement zone. |
5.56 Rifle Ammo / HV 5.56 Rifle Ammo / Explosive 5.56 Rifle Ammo / Incendiary 5.56 Rifle Ammo | Varies | Varies | Standard, high velocity (HV), explosive, and incendiary rounds each offer unique effects: HV rounds travel faster and drop less, explosive rounds deal splash damage, and incendiary rounds ignite targets. |
HV Pistol Ammo / Pistol Bullet / Incendiary Pistol Bullet | Varies | Varies | HV pistol ammo offers higher velocity, while incendiary pistol bullets can ignite the balloon. |
12 Gauge Slug / 12 Gauge Buckshot / 12 Gauge Incendiary Shell | Varies | Varies | Slugs provide high single-target damage, buckshot spreads for close range, and incendiary shells ignite targets. |
Handmade Shell | Low | High | Custom crafted, less efficient but usable. |
Fire Arrow | Moderate | Varies | Ignites the balloon, causing fire damage over time. |
Bee Catapult Bomb / Propane Explosive Bomb | High | Few | Throwable explosives; bee catapult bomb and propane explosive bomb cause significant area damage. |
Semi Automatic Rifle | 10 | 50 | Balanced option for sustained fire. |
Piercer Bolt | Varies | Varies | Specialized bolt designed to penetrate targets, effective against balloon fabric. |
Incendiary and explosive rounds are particularly effective for causing additional fire or splash damage, while HV (high velocity) rounds are valued for their speed and accuracy. Throwables like fire arrows, bee catapult bombs, and propane explosive bombs can ignite or heavily damage the hot air balloon, making them strategic choices for disabling or destroying it quickly.
Key Vulnerability Factors
No Damage Resistance: The balloon takes 100% of the damage listed for every weapon. There is no armor value reducing incoming damage.
Critical Weak Point: Damage is calculated against the entire balloon structure. Hitting the basket, envelope, or ropes all contribute equally to the 500 HP total. There is no “weak spot” to prioritize.
SAM Site Supremacy: The SAM site at the Military Tunnel deals massive, unavoidable damage (well over 500 HP) in a single lock-on missile. Entering the SAM site radius is an instant death sentence for the balloon. There is no counterplay.
Explosives Caution: Note that throwing C4 from the hot air balloon can be dangerous, as it may stick to the balloon and cause unintended destruction to your own craft.
Repair Mid-Fight? While technically possible to repair the balloon (using hammers) while under fire, the slow repair speed (1-2% per hammer swing) makes it nearly impossible to out-repair sustained gunfire. It’s almost always better to bail out immediately upon taking damage.
Is There Hot Air Balloon Armor?
No, there is no armor plating, armor kits, or any form of damage reduction that can be applied to the hot air balloon in Rust. This is a fundamental aspect of its design and balance.
Why the Confusion Exists
Vehicle Armor Parallels: Players familiar with armored cars (like the Battle Bus or armored sedan) often assume similar mechanics might exist for the balloon. This is incorrect. Vehicle armor mechanics do not apply to the balloon.
"Repair" Misinterpretation: Seeing players repair a damaged balloon mid-flight (using hammers) might be mistaken for "adding armor," but it's simply restoring lost health, not increasing maximum health or adding resistance.
Modded Server Myths: On unofficial/custom modded servers, admins could theoretically add armor mechanics via plugins. However, on all official Facepunch servers (the standard Rust experience), balloon armor does not and has never existed.
The Reality of Balloon Defense
Pure Health Pool: The balloon functions with a fixed 500 HP health pool, as detailed in the previous section. Nothing modifies this value.
Defense = Evasion & Awareness: Your only real defenses are:
Altitude: Flying very high (above 300m) makes you harder to hit with bullets and puts you outside the range of most player-fired rockets. However, you remain vulnerable to SAM sites and extremely skilled snipers.
Wind Utilization: Using wind currents to move unpredictably or quickly out of an engagement zone.
Situational Awareness: Constantly scanning for threats (players, turrets, SAM site proximity) and landing/bailing early.
Speed (Lack Thereof): Accepting that the balloon is slow and loud; stealth is impossible. Plan routes avoiding known hotspots.
The Repair "Workaround": While not armor, carrying repair hammers is a survival tactic:
If you take minor damage (e.g., 50-100 HP from distant shots), you can hammer the balloon mid-flight to restore some health, potentially buying time to escape.
This is highly risky: Hammering requires you to focus on the balloon, making you vulnerable. It's only viable against very light, sporadic fire. Against any serious assault, hammering is futile.
Flying the hot air balloon remains a high-risk, high-reward activity defined by its fragility. Its lack of armor is intentional, forcing players to rely on strategy, map knowledge, and environmental factors rather than brute durability. Master the wind, respect the 500 HP limit, and always have an escape plan when the burner flares up and the ground falls away.